Using 2 micro controllers, 2 boards communicating with a personal protocol, it really is Over engineered but useful nonetheless
This project is one of the oldest that was on my bench for years. After many iterations and tests, I finally fixed my intention and built it.
The goal of the project is to monitor the garage door and to interact in case I forgot the door open but more functions are required in my case.
Let me describe the goals of the project in details:
Check the door status and react
- Obviously, one of the most important thing that this controller has to do is to check if the door is open
- If the door is open, a timer is fired and 1 minute and a half later if no action are taken, the door is closed by my controller
- Another reason why the door must be closed is if the temperature inside the garage arrives around 5°C and going down in this case, the controller will take the action of closing the door because it may freeze and cause problems to the house
- As a maker, I may decide to work in the garage to paint, sand, or cut wood. In all these cases, I may need to leave the door open for a longer period of time
This door controller is equipped with many different sensors
- The most basic sensor and the most passive one is the light sensor. The controller monitors the light level inside the garage and, simply, reports the information on the website
- The other sensor that is interesting is the BME280. This small board is equipped with a temperature, humidity, and a barometric pressure sensor on board. The temperature sensor is used to check the temperature inside the garage and maintains an average value of the temperature so, let's say in winter I open the garage door, the temperature will drop rapidly but the sensor will not react that fast because of the rolling average. The temperature in the humidity are reported on the website.
- And, finally, the last sensor on that controller is a carbon monoxide gas sensor. Just like the other sensors, a rolling average is maintained inside the controller and a value is returned and stored on the website. For now, I did not program any reaction even though I could
The controller has many options to display informations.
Localview: I drilled the door frame and 3D printed a small plastic hub for a 3 color LED. This is the plastic piece that is used to display the Colors from within the house
On the image, the LED is green and this means that the door is closed
When the LED is blue, the door is partially open and when it is RED, the door is completely open
Webview: the website also gives a lot of informations:
I choose to use this type of graph to show the brightness in the garage and the door state
Next, I have a quick view if the door is closed, if not, it appears as red
I can also see the temperature, the humidity and the carbon dioxide overtime
Web interactions: And finally, I have the ability to interact with the controller via the web
I can trigger the opening or closing of the garage door using this button
And, using this slider, I can choose the delay, in hours, before the door closes by itself and if so, the slider overrides the information that I control via the pushbutton in the front of the controller
This push button is used to define the delay before the door closes when I work in my garage. Pushing the button makes the led blink in relation with the number of hours I want the door to stay opened.
As I mentioned in the YouTube video, the two controllers talks to each other with a Master-Slave configuration as I show in the conceptual image. The exchange of information, between the 2 boards, is using IIC
The Master IIC -the WEMOS D1 Mini Pro: This board is responsible asking the slave for all the information like the temperature, the door status, the light level or the gas level. Other functions of this board is to post the data on the web or read data from the web because this board has Wi-Fi built-in on it.
On startup, this board reads the Wi-Fi connection information from the microSD card and use it to connect to Adafruit and establish a bidirectional MQTT connection; reading and writing using MQTT
The Slave IIC - the Arduino mini pro 3.3v. The program inside this micro controller runs many STATE machines to get information about all the sensors, calculate and maintain floating averages of the temperature, the light level, the ping sensor distances, start and stop the reading of the GAS sensor and store all the values in rolling average variables ready to be sent to the master when needed.
As a slave, it is getting ready to answer the requests from the masters such as the value for the door state or the temperature in the garage.
This board has other things to do like, determining if the door is fully opened, half opened or closed and deciding if the door has to be closed.
It can trigger the relay, to close the garage door, based on 2 factors:
- It calculates that the door was open long enough
- it receives the order, from the master, to close the door
First, I created the electronic schema and board in Eagle, then I cut it on my CNC and tested it. It worked well but I wanted a better solution, a solution and I chose to go with JLCPCB.
It was not the first time that I used their service and, as usual, the result is flawless as you can see for
The bottom board: flip through the images and you will see the design, the order and the physical part
The same for the to board
The delay between my design, the order and the moment I received the boards was only a question of a week or so... great
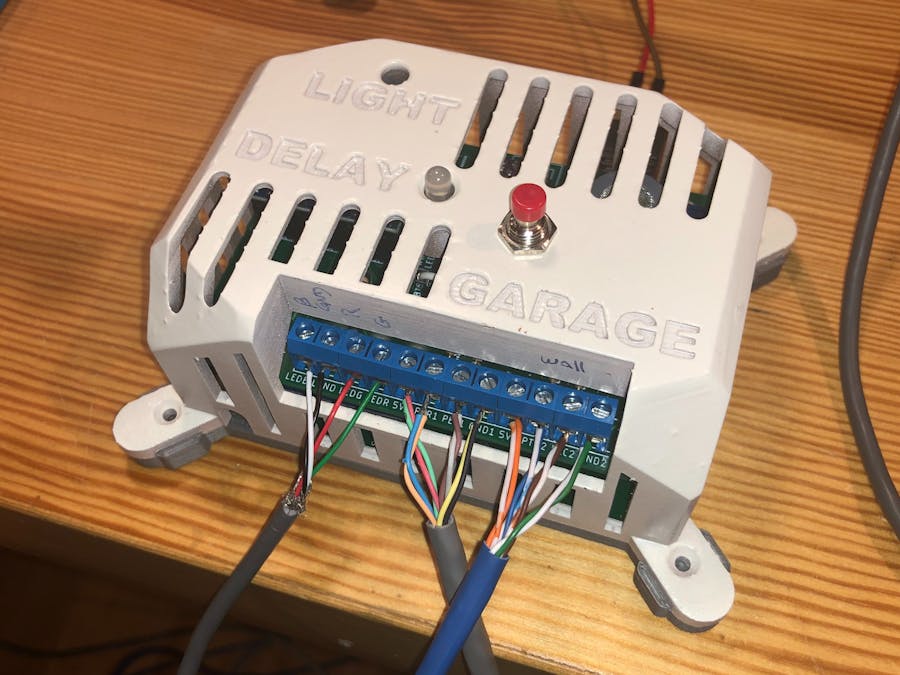
Here are the two boards ready to install into the enclosure
And this is the completed view of the product
This concludes the presentation of my Over-Engineered garage project.
I hope you enjoyed and I hope that I inspire you.
If you want to see more of my projects, please visit my Youtube Channel