Learn how to use ThingSpeak to develop IoT applications! In this project, we build a temperature sensor.
In this project, we are going to send the LM35 temperature sensor data to ThingSpeak using the ESP8266. ThingSpeak is basically an IOT platform that lets us store the data in the cloud and develop internet of things (IOT) applications.
We will create a channel on ThingSpeak, and after connecting the ESP8266 to our Wi-Fi network, we will send the data to the ThingSpeak IP address and API key.
Circuit Diagram
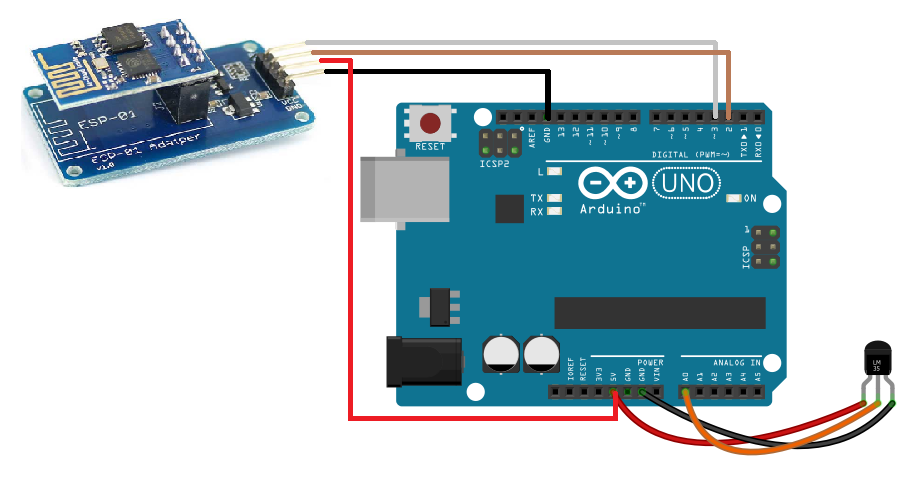
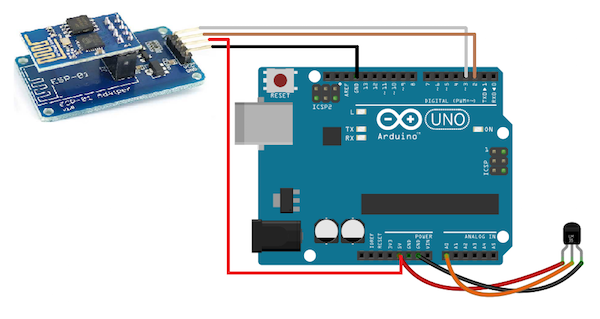
For connecting the ESP8266 with Arduino, we have used the ESP-01 adapter, which makes connecting much easier. Using this adapter, we don’t require the voltage divider circuit or any external power, because this adapter has a built-in voltage regulator.
Connect the VCC of the ESP-01 adapter to the 5V of Arduino and GND of adapter to the GND of Arduino. Then connect the TX of the adapter to pin 2 of Arduino, and the RX of the adapter to pin 3 of Arduino.
After that, connect the LM35 temperature sensor with Arduino. Connect the LM35 temperature sensor with Arduino as follows:
- Left pin of LM35 to 5V of Arduino
- Middle pin of LM35 to A0 of Arduino
- Right pin of LM35 to GND of Arduino
Creating a Channel on ThingSpeak
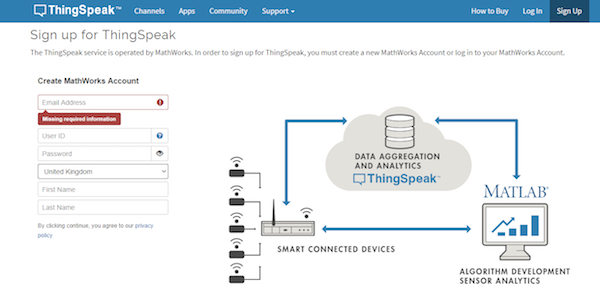
First, go to ThingSpeak.com and click on “Get Started for Free”.
The sign-up form will come up. Enter the information required and sign up for ThingSpeak.
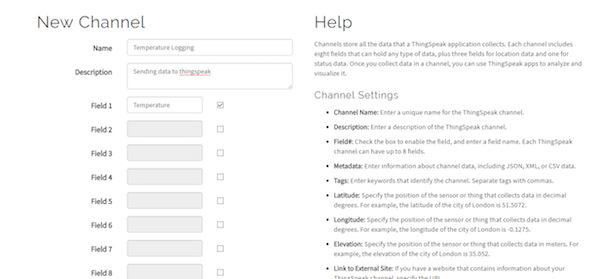
After that, click on “New Channel” to create a channel to store the information.
Then enter the information about the new channel as I have done below, and leave the other information as it is.
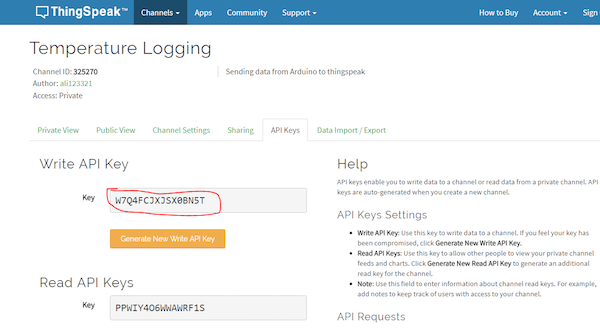
After that, go to the API keys section and copy your write API key. You will need to enter this in the below code.
Full Project Code
#include <SoftwareSerial.h>
SoftwareSerial esp(2,3);

#define DEBUG true
#define IP "184.106.153.149"// thingspeak.com ip
String Api_key = "GET /update?key=W7Q4FCJXJSX0BN5T"; //change it with your api key like "GET /update?key=Your Api Key"

int error;
const int sensor_pin = A0;
float temp;
float output;

void setup()
{
  Serial.begin(9600);
  esp.begin(9600);
  pinMode(sensor_pin,INPUT);

  send_command("AT+RST\r\n", 2000, DEBUG); //reset module
  send_command("AT+CWMODE=1\r\n", 1000, DEBUG); //set station mode
  send_command("AT+CWJAP=\"Tenda_31BC98\",\"barcelona\"\r\n", 2000, DEBUG);   //connect wifi network
  while(!esp.find("OK")) { //wait for connection
  Serial.println("Connected");}
}

void loop()
{
  output=analogRead(sensor_pin);
  temp =(output*500)/1023;
  start: //label
  error=0;
  updatedata();
  if (error==1){
    goto start; //go to label "start"
  }
  delay(1000);
}

void updatedata(){
  String command = "AT+CIPSTART=\"TCP\",\"";
  command += IP;
  command += "\",80";
  Serial.println(command);
  esp.println(command);
  delay(2000);
  if(esp.find("Error")){
    return;
  }
  command = Api_key ;
  command += "&field1=";
  command += temp;
  command += "\r\n";
  Serial.print("AT+CIPSEND=");
  esp.print("AT+CIPSEND=");
  Serial.println(command.length());
  esp.println(command.length());
  if(esp.find(">")){
    Serial.print(command);
    esp.print(command);
  }
  else{

   Serial.println("AT+CIPCLOSE");
   esp.println("AT+CIPCLOSE");
    //Resend...
    error=1;
  }
  }

String send_command(String command, const int timeout, boolean debug)
{
  String response = "";
  esp.print(command);
  long int time = millis();
  while ( (time + timeout) > millis())
  {
    while (esp.available())
    {
      char c = esp.read();
      response += c;
    }
  }
  if (debug)
  {
    Serial.print(response);
  }
  return response;
}
Code Explanation
First, you need to include the software serial library. The software serial will allow the serial communication on the other Arduino pins. The default serial communication pins of the Arduino are 0 and 1.
#include <SoftwareSerial.h>
SoftwareSerial esp(2,3);
Then we need to define the ThingSpeak IP address. You don’t need to change it, because it will be the same for everyone. Then we store the API key of the channel we created earlier in the string. In the below lines of code, change “W7Q4FCJXJSX0BN5T" with your API key that you saved earlier. This will be your channel API key where we are going to send the data.
#define IP "184.106.153.149"// thingspeak.com ip
String Api_key = "GET /update?key=W7Q4FCJXJSX0BN5T"; //change it with your api key like "GET /update?key=Your Api Key"
In the setup function, we set the module in the station mode and connected it with a Wi-Fi address. Enter your Wi-Fi name and password in the below lines of code. If the connection of the ESP8266 with the Wi-Fi network is successful, “Connected” will show on the serial monitor.
send_command("AT+RST\r\n", 2000, DEBUG); //reset module
send_command("AT+CWMODE=1\r\n", 1000, DEBUG); //set station mode
send_command("AT+CWJAP=\"Your wifi address\",\"Your password\"\r\n", 2000, DEBUG); //connect wifi network
while(!esp.find("OK")) { //wait for connection
Serial.println("Connected");}
In the update function, we gave the command to ESP8266 to send the data at IP address that we stored earlier and at port 80. Then we give the API key so the data will get stored in that channel. Now ThingSpeak will make a graph for our data with respect to time.
String command = "AT+CIPSTART=\"TCP\",\"";
command += IP;
command += "\",80";
Serial.println(command);
esp.println(command);
delay(2000);
if(esp.find("Error")){
return;
}
command = Api_key ;
command += "&field1=";
command += temp;
command += "\r\n";
Serial.print("AT+CIPSEND=");
esp.print("AT+CIPSEND=");
Serial.println(command.length());
esp.println(command.length());
if(esp.find(">")){
Serial.print(command);
esp.print(command);
}
If it won’t be able to send the data to ThingSpeak, “AT+CIPClOSE” will show on the serial monitor, which means that it will close the connection and retry again. Recheck your API key, Wi-Fi name and password if you are unable to send data to ThingSpeak.
else{
Serial.println("AT+CIPCLOSE");
esp.println("AT+CIPCLOSE");
//Resend...
error=1;
}
}
Check out the video below to see the project in action!
