Learn how you can build an infinity mirror complete with an Arduino-controlled LED show for around $100!
Infinity mirrors are fantastic wall decorations and Maker statement pieces. They look awesome, amaze little kids and adults alike, and are a fun way to demonstrate basic optics.
With the upgrade of an Arduino and addressable LEDs, you can make the mirror interactive and customizable. Best of all, it’s super easy to build and, if you find some glass or a mirror to start, it’s very cheap as well. In this project, I’ll show you how you can build an RGB infinity mirror for around $55 - $110.
Check out the video below of my completed build to get an idea of what's possible!
How Does an Infinity Mirror Work?
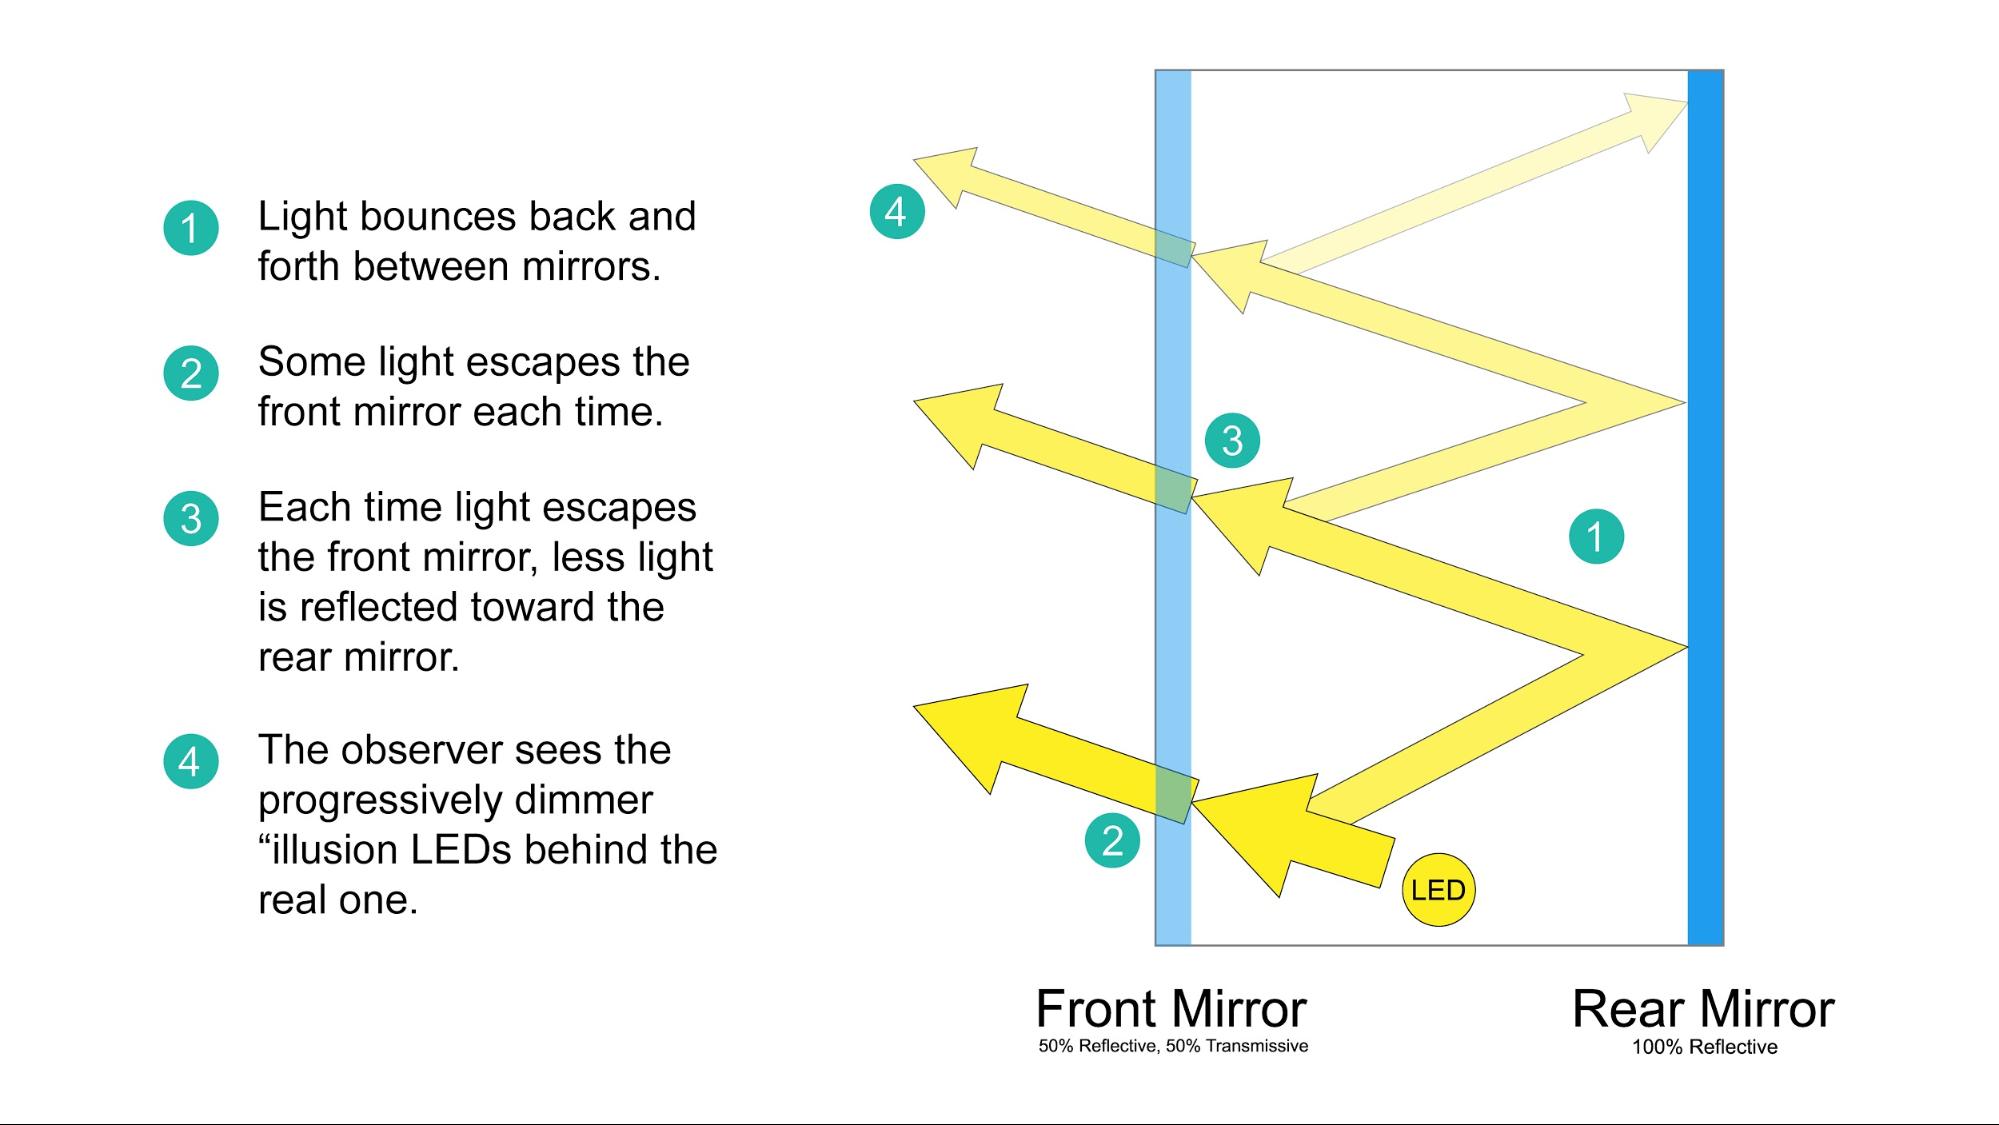
An infinity mirror contains a regular mirror that reflects 100% of the light, but the surface you look at is actually a one-way (or confusingly, two way) mirror that is less than 90% reflective.
How an infinity mirror works.
The above example shows a 50% reflective mirror but I recommend 65-70% reflective, which seems to work better from examples I’ve seen. The principle is the same, but the real trick is the light source or LEDs between the two mirrors. Some light gets through the one-way mirror, but the rest bounces back ad infinitum, growing dimmer each time.
By using a less transmissive one-way mirror, the effect dims more slowly and the mirror appears “deeper” with more LED reflections. You end up with a ton of virtual images of the same LED strip over and over as if they went deeper back into the mirror. This gives it a tunnel-like illusion seemingly going on to infinity (hence the name).
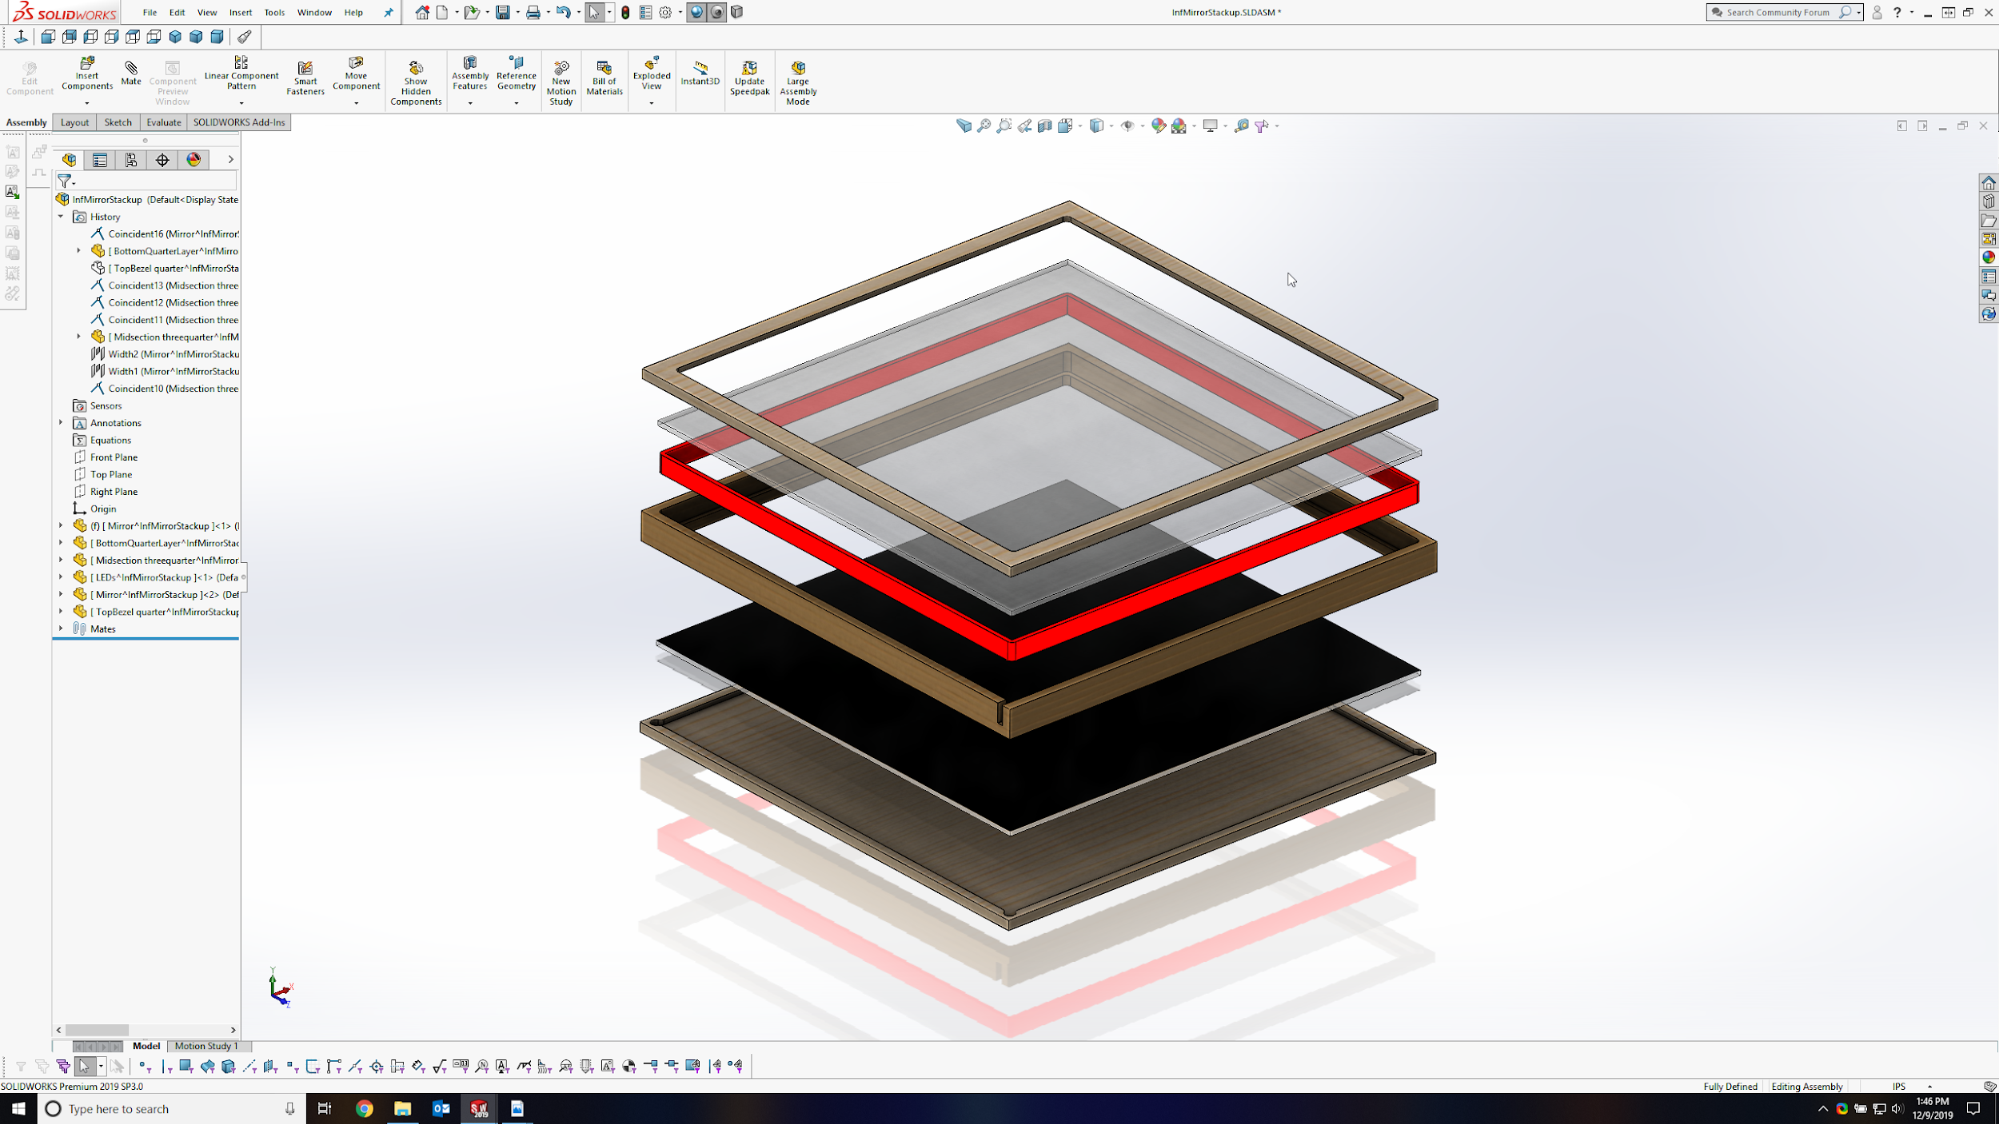
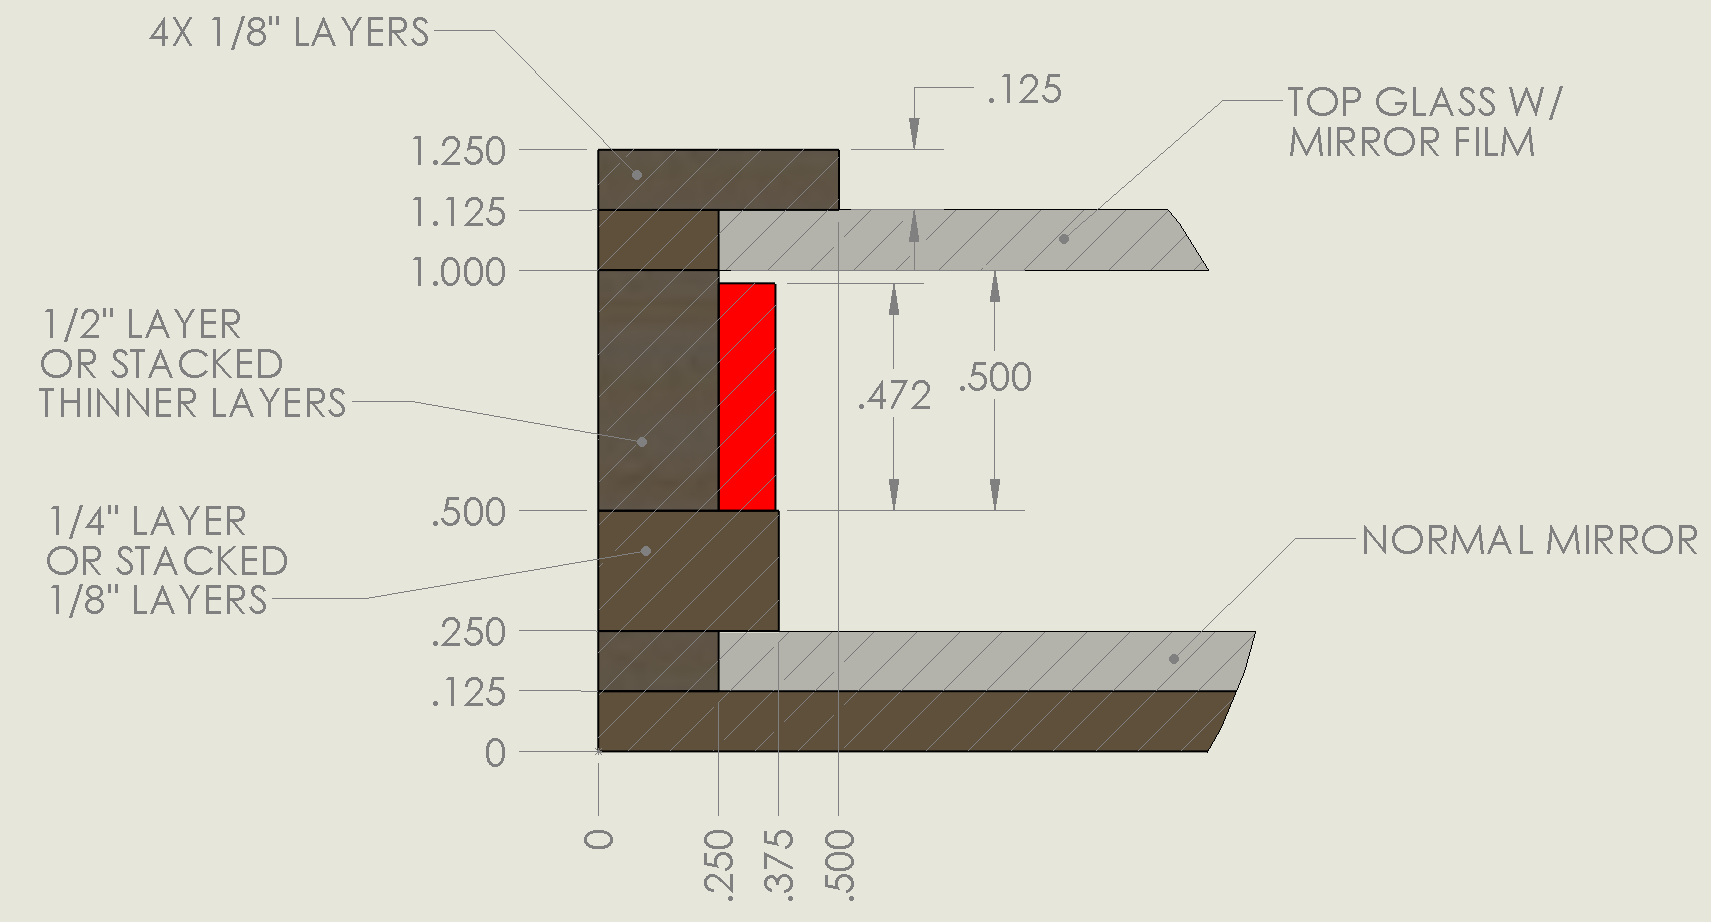
The basic order of mirrors and frames for an infinity mirror.
In order to make this illusion work, you need a way to hold a normal mirror at the back, with LEDs in front of the mirror, and a one-way mirror in front of the LEDs.
A side view of the order of materials in an infinity mirror.
One-way mirrors can be purchased premade, but they are stupidly expensive. Using a piece of glass with cheap window tint film is much more affordable and gives you control over the reflectivity.
Note: You can try using clear plastic, but it’s much more difficult to work with than glass, as these films tend to bubble up on plastic leaving many visible marks. Also, the plastic is easily scratched, which ruins the illusion. The lesser optical clarity also diminishes the effect.
How Much Will Building an Infinity Mirror Cost?
Based on the mirror I built, I was able to create a BOM for around $100.
The bulk of the cost for an infinity mirror lies in buying glass and a mirror. If you choose to make the cheapest version you can buy a four-pack of Ikea square foot mirrors and remove the mirror backing from a couple to make it into glass, cutting the project cost in half. However, removing the mirror backing can be a tedious chore and it might be a good idea to think of the time/cost analysis of this extra step.
By spending about $64 for custom-cut glass and a mirror to match, you can make your infinity mirror any size — up to 24” x 24” for under $110.
Note: 12” x 12” custom-cut glass is still around $60, so the cost barely increases as you go bigger.
Infinity Mirror BOM
Item | Average Price | Notes |
|---|
Glass (16x16) | $ 32.00 | Smaller is cheaper, but circles cost more. Could be any size within reason |
Mirror (16x16) | $ 32.00 | Smaller is cheaper, but circles cost more. Could be any size within reason |
Arduino Nano Every w/ Cable | $ 13.00 | Works just like an Uno but smaller and cheaper |
2ft x 4ft x 1/4" MDF | $ 6.00 | Router method - top and bottom panels |
2ft x 2ft x 3/4" MDF | $ 6.00 | Router or laster method - central panel |
4ft x 8ft x 1/8" Hardboard | $ 8.00 | Laser method - many layers stacked up |
5V 2A USB Power Supply | $ 7.00 | Lots of cheaper ones available & powerful options. LED current is ~40mA/LED max, or 2.4 |
WS2812B LED strips 60+ per meter | $ 9.00 | 60/m like 7$/meter, 144LED/m like $12m/m. 5m strips 60LED/m around $21 |
Window Mirror Film (30 - 40% VLT) | $ 8.00 | Can be bought many places. I used 30% VLT film, but anything in this range should look good. |
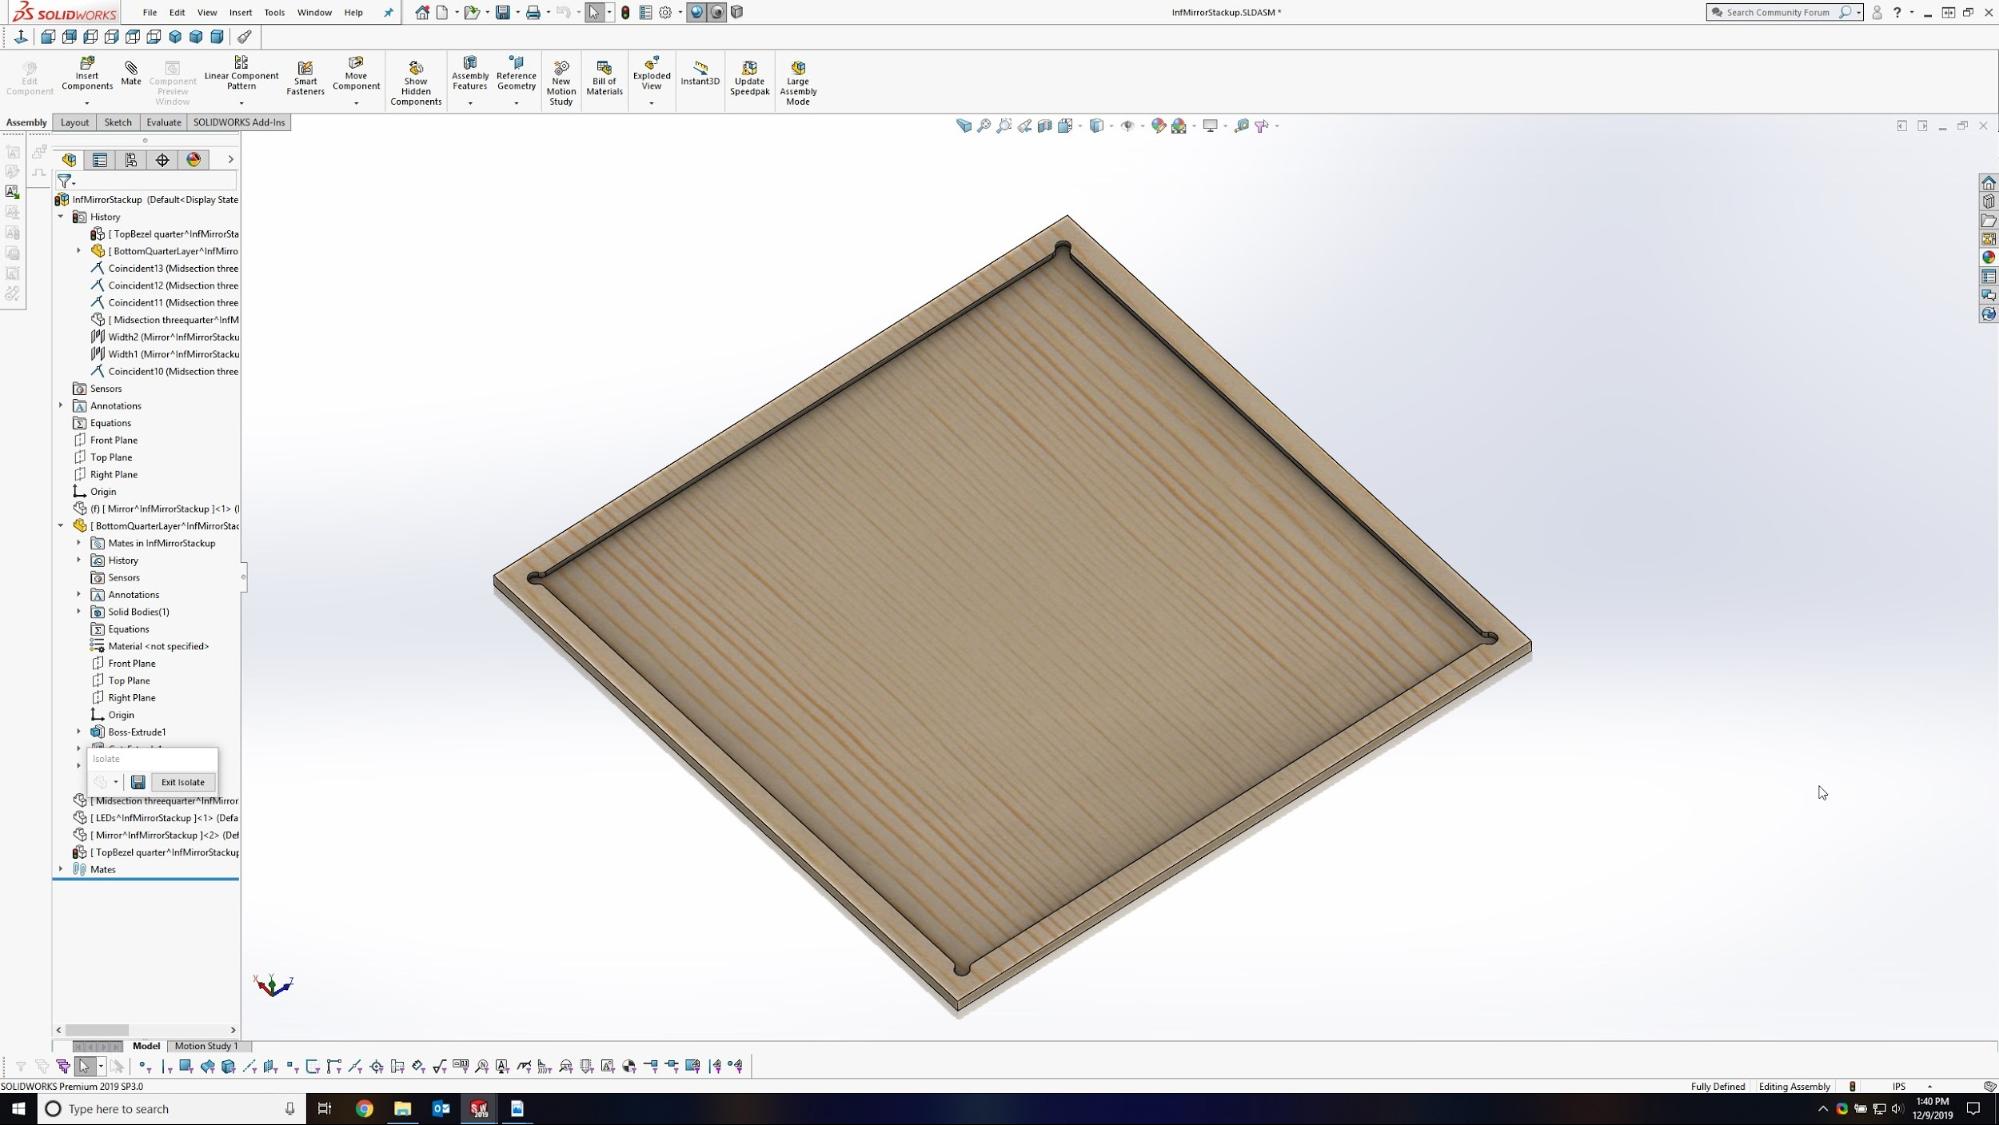
Building the Infinity Mirror
The easiest way to make an infinity mirror is by layering wood with different-sized bezels to properly position and hold the mirror, LEDs, and glass. You could make this more complicated and conceal the Arduino inside if you choose, but I prefer to keep it outside so it can be reprogrammed easily.
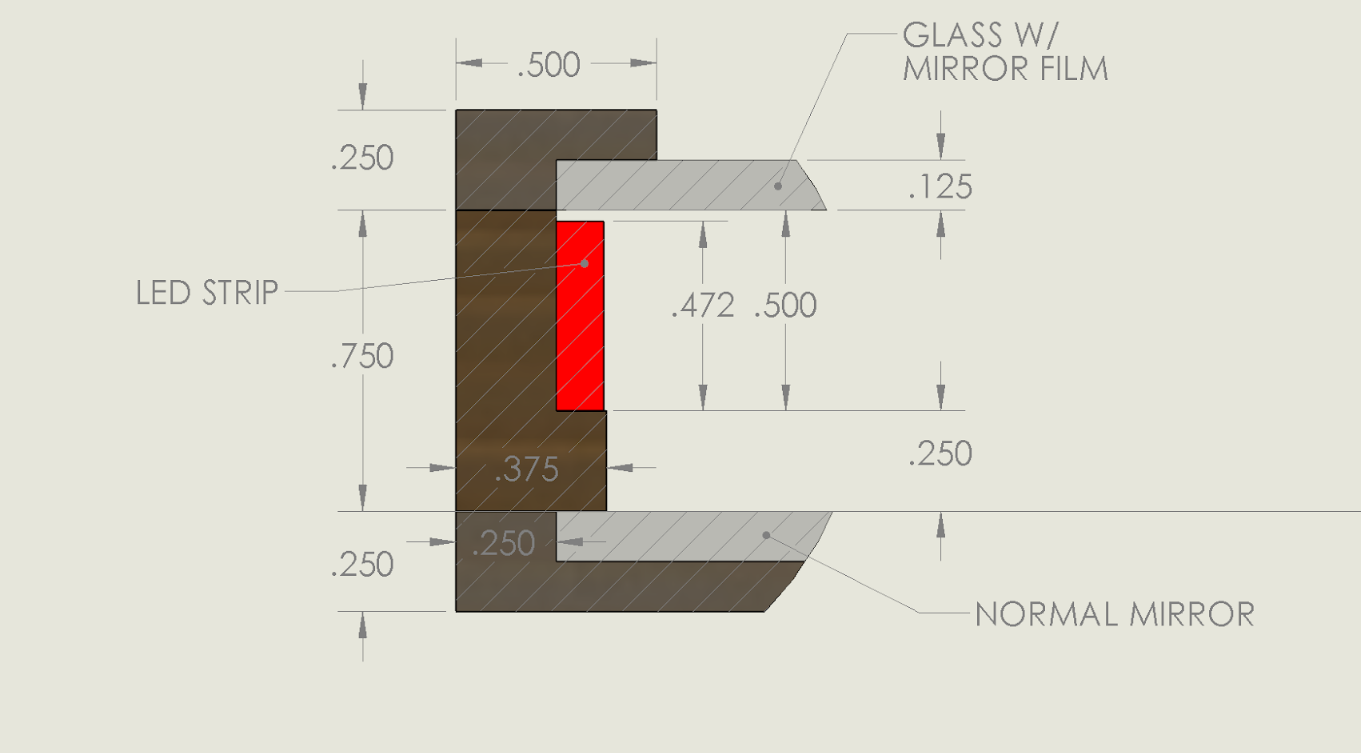
Home Depot carries MDF (medium density fiberboard) and hardboard (basically the same but larger fibers) which is super easy to cut with a bandsaw, router (CNC or otherwise), or suitable laser cutter. It is also incredibly cheap and useful for all kinds of DIY projects. If you use a router, two ¼” panels and one ¾” panel can be used to make the entire structure of the mirror as shown.
Side view of the panel and mirror placements. Two ¼” panels and one ¾” panel works well.
With a laser cutter, you can only cut all the way through panels, which means you can do the same thing by stacking many layers of ⅛” panels instead of using just two ¼” panels and routing a lip into them.
Side view of the panel and mirror placements if you use a laser cutter.
LED Strip Design and Placement
I recommend recessing the LEDs behind the bezel at the front of the mirror. Doing so provides a better optical illusion than if the LED strip was visible. You could even add a diffusing element if you so choose.
You can definitely make an infinity mirror with 30 LED/m strips. However, the more LEDs you use, the closer they’ll be to each other and, therefore, the smoother a rainbow or color shifting effect can be made.
If you make the mirror a custom size, be sure to size it so a fixed number of LEDs fit per side. Then you can create better animations that take advantage of edge symmetry. Feel free to play around with all of the dimensions as you see fit!
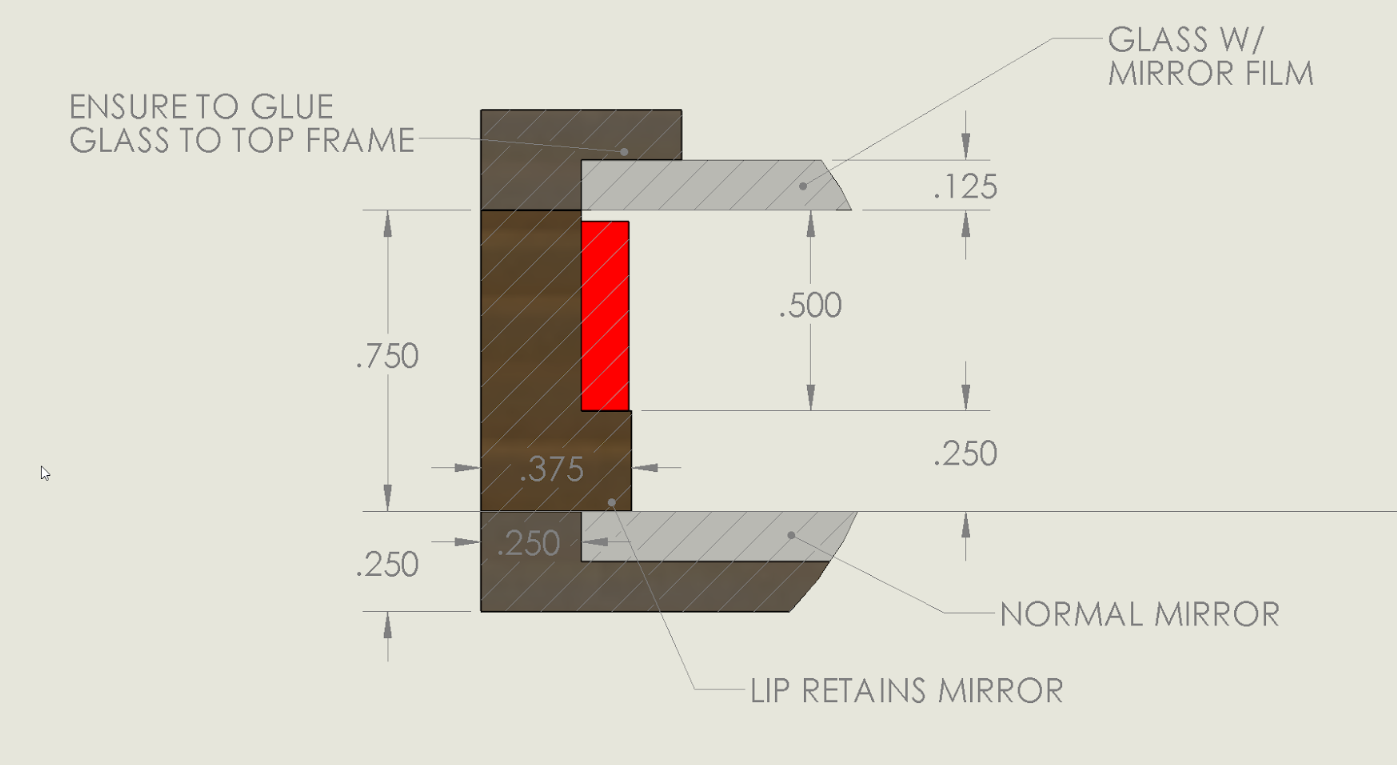
It will work out great provided the glass and mirror are secured in place and the edges have enough wood exposed to glue together properly. You could also try adding edge banding made of thin sheet metal or hardwood veneer to hide the layers. With enough sanding, paint would likely cover the lines as well.
Keep in mind that if you use the CNC router method, all of your internal corners will have a radius of at least the router bit. You need to ‘dogbone’ the corners as shown where the square corners of the glass and mirror need to fit.
With the CNC router method, make sure ‘dogbone’ the corners where the glass and mirror need to fit.
Finally, don’t forget that the LED strip wires need somewhere to go! You can drill a hole in the side of the section where the LEDs sit to pass wires through to meet at the inside corner or you could add a cutout with the router toolpath.
Programming the Electronics
In order to have all of the electronic components work in this project, there are a few things to keep in mind. Let's take a look at how to safely power and connect everything.
Powering the Mirror
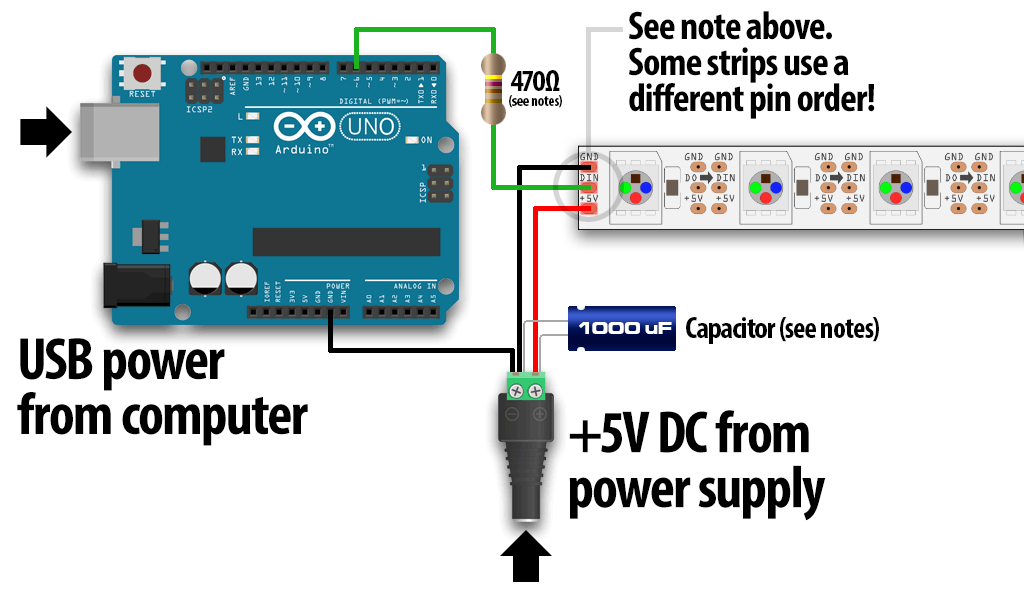
If you need 500mA or less for power, all you need is any USB wall charger, and a USB cable to plug into the Arduino running your code, ensuring the 5V line and ground line are split out to the LEDs. If you’re using up to 2A with a USB charger, cut the USB connector open and solder separate 5V and GND wires to the LEDs and Arduino so the full 2A can run to the LEDs without needing to be carried by the tiny Arduino traces.
For more than 2A of power, follow the same steps to split out the power directly to the LEDs, but also see the addition below. As Adafruit instructs: “When connecting NeoPixels to any live power source or microcontroller, ALWAYS CONNECT GROUND (–) BEFORE ANYTHING ELSE. Conversely, disconnect ground last when separating.”
Schematic for connecting a WS2812B LED strip to an Arduino. Image courtesy of Michael Schoeffler.
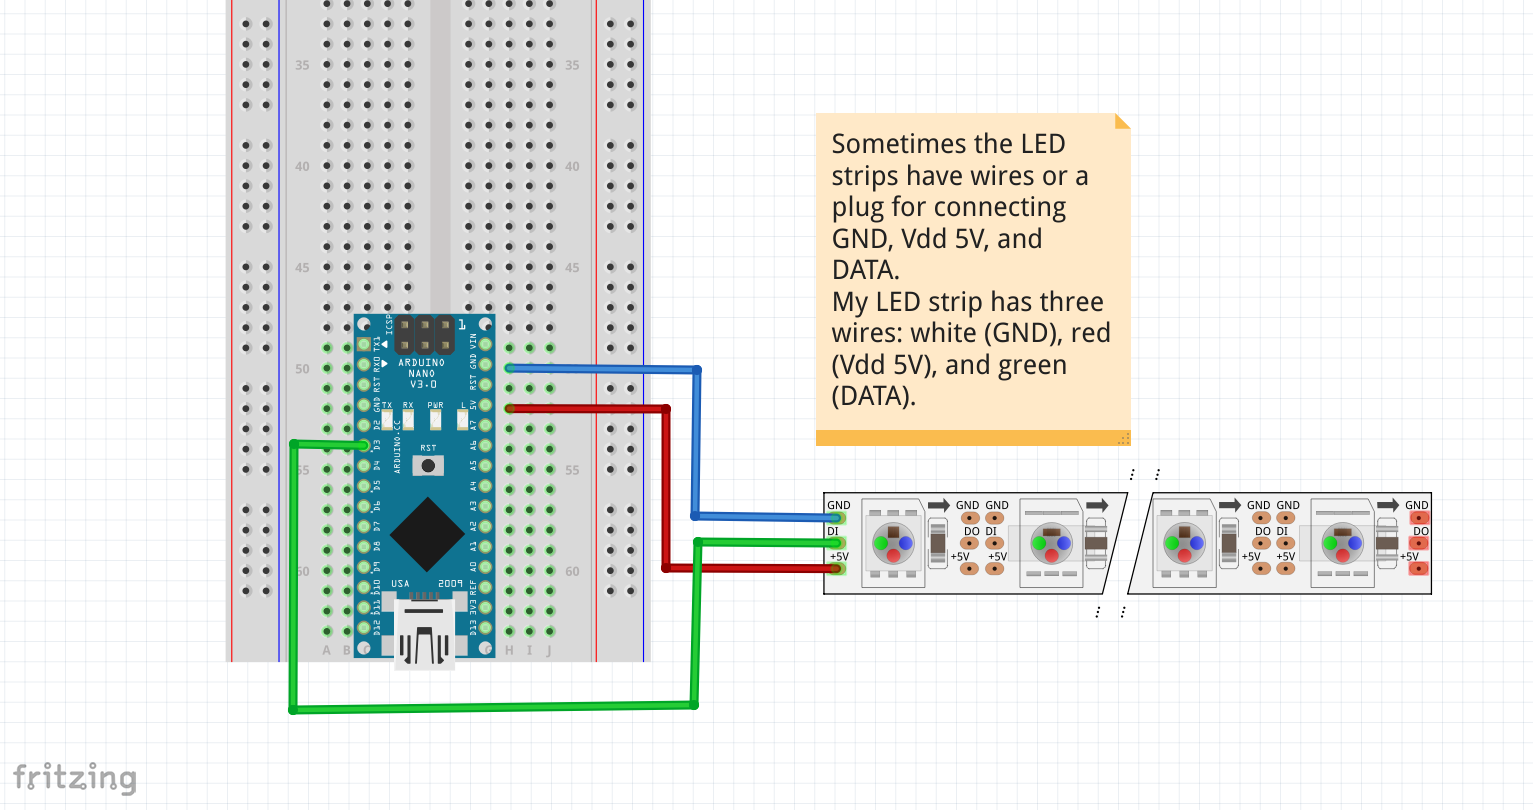
Connecting the Arduino to an LED Strip
I used WS2812B LED strips in my build, which use the same onboard chips as Adafruit’s Neopixels but a fraction of the price.
There are three connections that need to be made in total to the Arduino.
WS2812B | Arduino Nano Every | Notes |
|---|
5V | 5V | Not actually necessary if using the larger amperage supplies. |
GND | GND | Always necessary |
DIN (or data-in) | Any PWM-enabled IO pin | Always necessary |
If like me, you have a much bigger LED strip that needs more than 2A of power, you may want to follow the Adafruit Neopixel Uberguide suggestions of using a filter capacitor and maybe even a resistor in order to mitigate a power spike from plugging and unplugging wall power. I have not found a resistor necessary, but it certainly can’t hurt to have one.
When connecting LED strips to the power and an Arduino, always connect GND first. Image courtesy of Adafruit.
Infinity Mirror Code
The simplest and easiest thing to do is use the FastLED library. The DemoReel100 code provides a great starting point — you can add, remove, or even create your own animations if you know what you’re doing. If you want to go hardcore, add a Wi-Fi or Bluetooth module to add more control over the mirror.
Here’s the result!
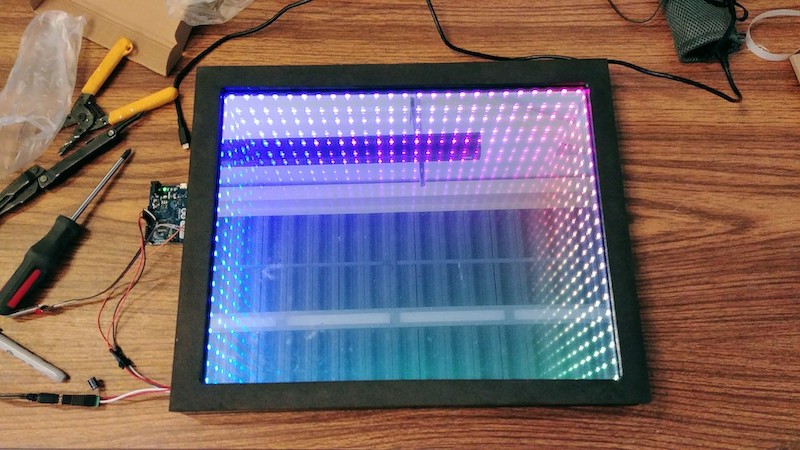
My completed infinity mirror, ready to wow the crowd!
I hope you have fun making one of these, and happy building to you all!