Learn how to create an easy, funny robot with LEDs and an Arduino UNO.
The need to be able to measure a distance that separates two positions can have numerous applications in different areas of our daily lives.
From the moment that it is possible to obtain the adequate distance between two positions, it is possible to develop and design automatic door systems, security systems, monitoring, and various automation systems through an algorithm that performs these functions.
From there, you will learn how to assemble a funny robot.
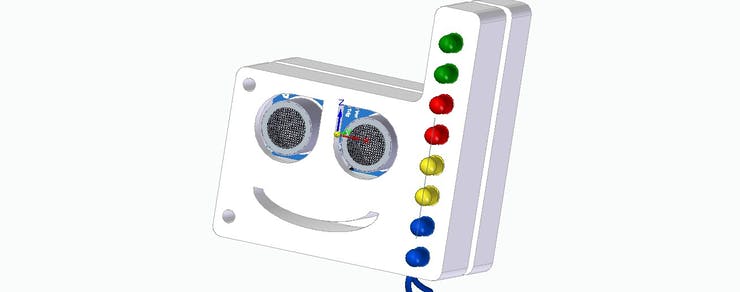
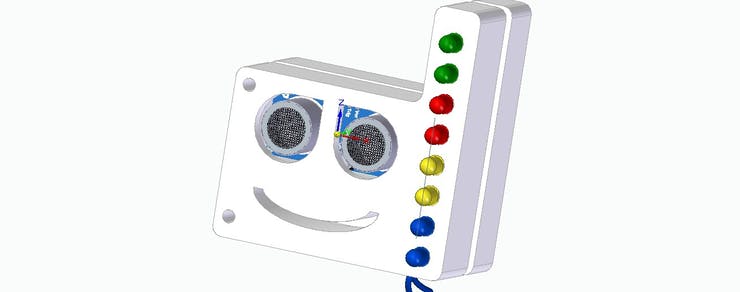
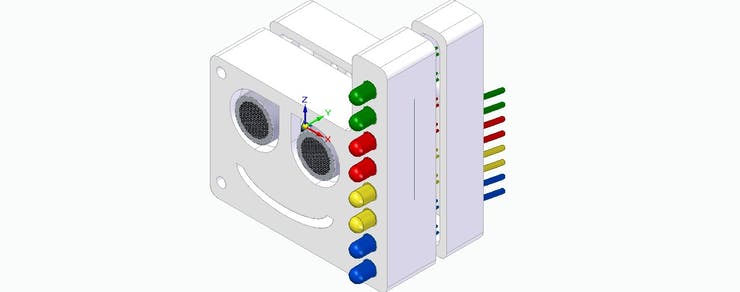
The funny robot is a small robot that uses a didactic case with LEDs and an ultrasonic sensor to calculate the distance.
Its case is shown in Figure 1.
For the implementation of this didactic case, you will learn how to assemble the basic circuit with the UNO arduino and create the programming.
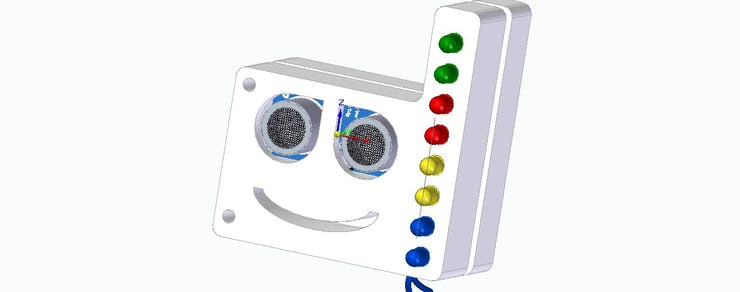
As you can see, the case has a structure similar to a happy face and some side LEDs, to indicate the proximity of an object or person in front of it. This distance at which the LED's will light up, will be implemented in the program presented.
For this project, the ultrasonic sensor HC-SR04 was used, which works from the emission and reception of sound waves.
In this article you will learn how to program and use the HC-SR04 ultrasonic sensor and understand its working principle.
Therefore, through this article you will learn:
- Know the structure of the HC-SR04 Ultrasonic Sensor;
- Understand the operation of the HC-SR04 Ultrasonic Sensor;
- Perform Communication between the Ultrasonic Sensor HC-SR04 and the Arduino UNO R3
- It presents the structure of the Ultrasonic Sensor HC-SR04 to the teaching case developed by Robô Lúdico.
Now, we will start the full presentation of the development of the Didactic Ultrasonic Sensor HC-SR04 Using Arduino UNO.
Discover How to Develop the Funny Robot
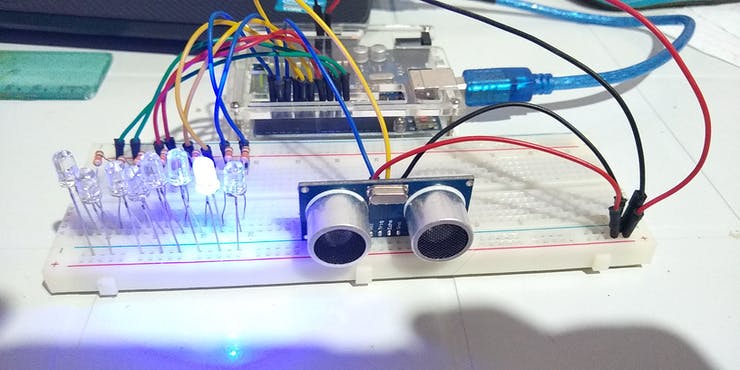
This project consists of presenting a didactic model using the HC-SR04 ultrasonic sensor with the UNO arduino development board.
The project is basically constituted by the LEDs, the ultrasonic sensor HC-SR04, the UNO arduino development board, which will send the necessary pulses to read the distance with the sensor, as shown in Figure 2.
The project is made up of LEDs, an HC-SR04, and an Arduino UNO.
The signal emitted by the ultrasonic sensor is similar to a wave that travels through space, and in this way, it will detect the structure closest to the object, as illustrated in Figure 3.
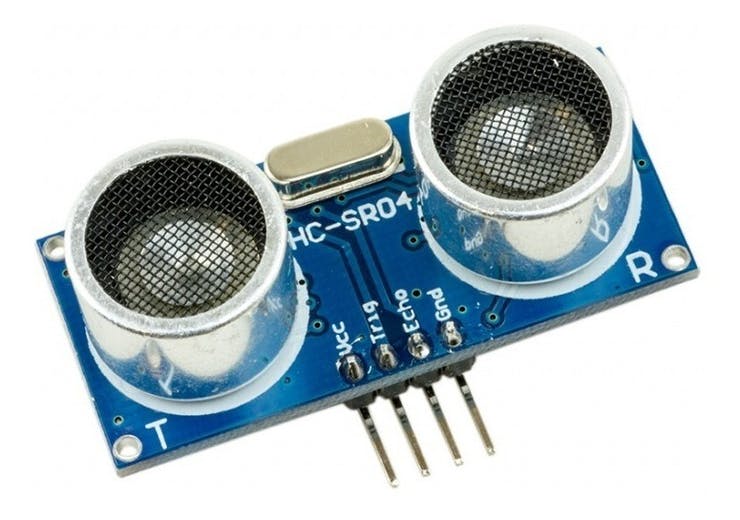
The HC-SR04 Ultrasonic Sensor is basically constituted by an oscillating crystal, an emitter and receiver sonic bursts and the power pins.
Figure 4 illustrates the main components of the HC-SR04 ultrasonic sensor.
The HC-SR04 ultrasonic sensor.
The sensor sends high frequency sound waves. They collide with a certain object that is in its path and return to the sensor, which will capture them.
Finally, we use the average speed equation, illustrated by Equation 1, which allows us to calculate the distance traveled by the sound wave.
Espaço (m) =Velocidade (m/s)* Tempo (s)
Based on the calculated distance, the LEDs will be activated to indicate the proximity of the funny robot to the object.
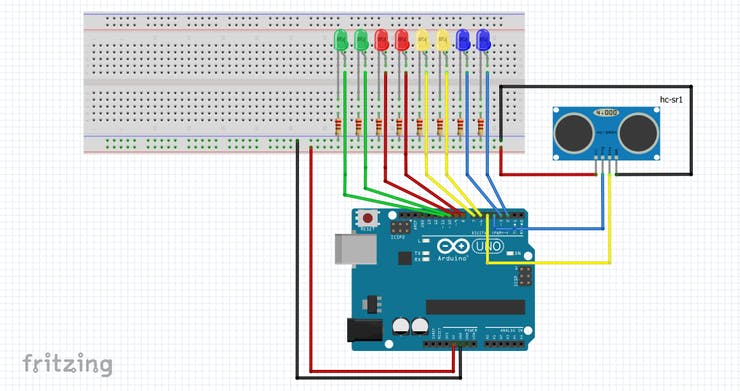
To set up the experiment, first make sure that your Arduino is turned off by disconnecting it from the USB cable. Now, take the components and connect everything as shown in figure 5 below.
According to the wiring diagram illustrated by Figure 5, the experiment consists of the circuit composed of the sensor, the arduino uno circuit, the LED's, and resistors.
The sensor used is the HC-SR04, which has 4 pins, the power pin (Vdc) being connected to the 5 volts of the arduino uno through the protoboard, as well as its GND.
The Trigger pin will be connected to digital pin 4, which will be responsible for sending the pulses every 10 us (microseconds). And finally, the Echo pin, which was connected to digital pin 5.
With the circuit correctly connected, start programming according to the complete code, which is shown below.
//inicio - leds
int Led_azul1 = 2;
int Led_azul2 = 3;
int Led_amarelol = 6;
int Led_amarelo2 = 7;
int Led_vermelho1 = 8;
int Led_vermelho2 = 9;
int Led_verde1 = 10;
int Led_verde2 = 11;

//fim - leds

int inches = 0;

float cm = 0;

int triggerPin = 4;
int echoPin = 5;

long readUltrasonicDistance(int triggerPin, int echoPin)// funçao responsavel por processar o sinal dos pinos Trig e Echo
{
  pinMode(triggerPin, OUTPUT);  // apaga o pino de Trig
  digitalWrite(triggerPin, LOW);
  delayMicroseconds(2);
  // coloca o pino de Trig em nivel logico alto por 10 us
  digitalWrite(triggerPin, HIGH);
  delayMicroseconds(10);
  digitalWrite(triggerPin, LOW);
  pinMode(echoPin, INPUT);
  //  Lê o pino Echo, e retorna o tempo de trajetoria da onda em microsegundos
  return pulseIn(echoPin, HIGH);
}

void setup()
{
  pinMode(Led_azul1,OUTPUT);
  pinMode(Led_azul2,OUTPUT);
  pinMode(Led_amarelol,OUTPUT);
  pinMode(Led_amarelo2,OUTPUT);
  pinMode(Led_vermelho1,OUTPUT);
  pinMode(Led_vermelho2,OUTPUT);
  pinMode(Led_verde1,OUTPUT);
  pinMode(Led_verde2,OUTPUT);
  Serial.begin(9600);
}

void loop()
{
  // medida do sinal em centimetros
  cm = 0.01723 * readUltrasonicDistance(4, 5);
  // para converter o valor de centimetros em polegadas basta dividir por 2.54
  inches = (cm / 2.54);

  /*ANOTACOES
 distancia minima  3
distancia maxima  336
intervalo 333
Quantidade de leds  8
relação cm/leds = 41.625
led_azul1 3 cm a 44.625 cm
led_azul2 44.625 cm  a 86.25 cm
led_amarelo1  86.25 cm a 127.875 cm
led_amarelo2  127.875 cm a 169.5 cm
led_vermelho1 169.5 cm a 211.125 cm
led_vermelho2 211.125 cm a 252.75 cm
led_verde1  252.75 cm  a 294.375 cm
led_verde2  294.375 cm a 336 cm

  */
  //INICIO - CONDICAO LEDS
  if((cm>=3)&&(cm<44.625)){
    digitalWrite(Led_azul1, HIGH);
    digitalWrite(Led_azul2, LOW);
    digitalWrite(Led_amarelol,LOW);
    digitalWrite(Led_amarelo2,LOW);
    digitalWrite(Led_vermelho1, LOW);
    digitalWrite(Led_vermelho2, LOW);
    digitalWrite(Led_verde1,LOW);
    digitalWrite(Led_verde2,LOW);
  }
  else if((cm>=44.625)&&(cm<86.25)){
    digitalWrite(Led_azul1,LOW);
    digitalWrite(Led_azul2,HIGH);
    digitalWrite(Led_amarelol,LOW);
    digitalWrite(Led_amarelo2,LOW);
    digitalWrite(Led_vermelho1, LOW);
    digitalWrite(Led_vermelho2, LOW);
    digitalWrite(Led_verde1,LOW);
    digitalWrite(Led_verde2,LOW);
  }
  else if((cm>=86.25)&&(cm<127.875)){
    digitalWrite(Led_azul1, LOW);
    digitalWrite(Led_azul2, LOW);
    digitalWrite(Led_amarelol,HIGH);
    digitalWrite(Led_amarelo2,LOW);
    digitalWrite(Led_vermelho1, LOW);
    digitalWrite(Led_vermelho2, LOW);
    digitalWrite(Led_verde1,LOW);
    digitalWrite(Led_verde2,LOW);
  }
  else if((cm>=127.875)&&(cm<169.5)){
    digitalWrite(Led_azul1, LOW);
    digitalWrite(Led_azul2, LOW);
    digitalWrite(Led_amarelol,LOW);
    digitalWrite(Led_amarelo2,HIGH);
    digitalWrite(Led_vermelho1, LOW);
    digitalWrite(Led_vermelho2, LOW);
    digitalWrite(Led_verde1,LOW);
    digitalWrite(Led_verde2,LOW);
  }
   else if((cm>=169.5)&&(cm<211.125)){
    digitalWrite(Led_azul1, LOW);
    digitalWrite(Led_azul2, LOW);
    digitalWrite(Led_amarelol,LOW);
    digitalWrite(Led_amarelo2,LOW);
    digitalWrite(Led_vermelho1, HIGH);
    digitalWrite(Led_vermelho2, LOW);
    digitalWrite(Led_verde1,LOW);
    digitalWrite(Led_verde2,LOW);
  }
   else if((cm>=211.125)&&(cm<252.75)){
    digitalWrite(Led_azul1, LOW);
    digitalWrite(Led_azul2, LOW);
    digitalWrite(Led_amarelol,LOW);
    digitalWrite(Led_amarelo2,LOW);
    digitalWrite(Led_vermelho1, LOW);
    digitalWrite(Led_vermelho2, HIGH);
    digitalWrite(Led_verde1,LOW);
With the circuit correctly connected, start programming according to the code presented below, which illustrates the definition of the digital pins for each LED, the initialization of the variables, as well as the function responsible for processing the signals on the Trigger and Echo pins.
//inicio - leds
int Led_azul1 = 2;
int Led_azul2 = 3;
int Led_amarelol = 6;
int Led_amarelo2 = 7;
int Led_vermelho1 = 8;
int Led_vermelho2 = 9;
int Led_verde1 = 10;
int Led_verde2 = 11;

//fim - leds

int inches = 0;

float cm = 0;

int triggerPin = 4;
int echoPin = 5;

long readUltrasonicDistance(int triggerPin, int echoPin)// funçao responsavel por processar o sinal dos pinos Trig e Echo
{
  pinMode(triggerPin, OUTPUT);  // apaga o pino de Trig
  digitalWrite(triggerPin, LOW);
  delayMicroseconds(2);
  // coloca o pino de Trig em nivel logico alto por 10 us
  digitalWrite(triggerPin, HIGH);
  delayMicroseconds(10);
  digitalWrite(triggerPin, LOW);
  pinMode(echoPin, INPUT);
  //  Lê o pino Echo, e retorna o tempo de trajetoria da onda em microsegundos
  return pulseIn(echoPin, HIGH);
}
After that, we have the void setup function. All LED pins are configured as digital outputs. The code is presented below.
void setup()
{
  pinMode(Led_azul1,OUTPUT);
  pinMode(Led_azul2,OUTPUT);
  pinMode(Led_amarelol,OUTPUT);
  pinMode(Led_amarelo2,OUTPUT);
  pinMode(Led_vermelho1,OUTPUT);
  pinMode(Led_vermelho2,OUTPUT);
  pinMode(Led_verde1,OUTPUT);
  pinMode(Led_verde2,OUTPUT);
  Serial.begin(9600);
}
The LEDs were triggered based on a distance range. The code in void loop function is presented below.
void loop()
{
  // medida do sinal em centimetros
  cm = 0.01723 * readUltrasonicDistance(4, 5);
  // para converter o valor de centimetros em polegadas basta dividir por 2.54
  inches = (cm / 2.54);

  /*ANOTACOES
 distancia minima  3
distancia maxima  336
intervalo 333
Quantidade de leds  8
relação cm/leds = 41.625
led_azul1 3 cm a 44.625 cm
led_azul2 44.625 cm  a 86.25 cm
led_amarelo1  86.25 cm a 127.875 cm
led_amarelo2  127.875 cm a 169.5 cm
led_vermelho1 169.5 cm a 211.125 cm
led_vermelho2 211.125 cm a 252.75 cm
led_verde1  252.75 cm  a 294.375 cm
led_verde2  294.375 cm a 336 cm

  */
  //INICIO - CONDICAO LEDS
  if((cm>=3)&&(cm<44.625)){
    digitalWrite(Led_azul1, HIGH);
    digitalWrite(Led_azul2, LOW);
    digitalWrite(Led_amarelol,LOW);
    digitalWrite(Led_amarelo2,LOW);
    digitalWrite(Led_vermelho1, LOW);
    digitalWrite(Led_vermelho2, LOW);
    digitalWrite(Led_verde1,LOW);
    digitalWrite(Led_verde2,LOW);
  }
  else if((cm>=44.625)&&(cm<86.25)){
    digitalWrite(Led_azul1,LOW);
    digitalWrite(Led_azul2,HIGH);
    digitalWrite(Led_amarelol,LOW);
    digitalWrite(Led_amarelo2,LOW);
    digitalWrite(Led_vermelho1, LOW);
    digitalWrite(Led_vermelho2, LOW);
    digitalWrite(Led_verde1,LOW);
    digitalWrite(Led_verde2,LOW);
  }
  else if((cm>=86.25)&&(cm<127.875)){
    digitalWrite(Led_azul1, LOW);
    digitalWrite(Led_azul2, LOW);
    digitalWrite(Led_amarelol,HIGH);
    digitalWrite(Led_amarelo2,LOW);
    digitalWrite(Led_vermelho1, LOW);
    digitalWrite(Led_vermelho2, LOW);
    digitalWrite(Led_verde1,LOW);
    digitalWrite(Led_verde2,LOW);
  }
  else if((cm>=127.875)&&(cm<169.5)){
    digitalWrite(Led_azul1, LOW);
    digitalWrite(Led_azul2, LOW);
    digitalWrite(Led_amarelol,LOW);
    digitalWrite(Led_amarelo2,HIGH);
    digitalWrite(Led_vermelho1, LOW);
    digitalWrite(Led_vermelho2, LOW);
    digitalWrite(Led_verde1,LOW);
    digitalWrite(Led_verde2,LOW);
  }
   else if((cm>=169.5)&&(cm<211.125)){
    digitalWrite(Led_azul1, LOW);
    digitalWrite(Led_azul2, LOW);
    digitalWrite(Led_amarelol,LOW);
    digitalWrite(Led_amarelo2,LOW);
    digitalWrite(Led_vermelho1, HIGH);
    digitalWrite(Led_vermelho2, LOW);
    digitalWrite(Led_verde1,LOW);
    digitalWrite(Led_verde2,LOW);
  }
   else if((cm>=211.125)&&(cm<252.75)){
    digitalWrite(Led_azul1, LOW);
    digitalWrite(Led_azul2, LOW);
    digitalWrite(Led_amarelol,LOW);
    digitalWrite(Led_amarelo2,LOW);
    digitalWrite(Led_vermelho1, LOW);
    digitalWrite(Led_vermelho2, HIGH);
    digitalWrite(Led_verde1,LOW);
    digital
As you can see in the code above, the sensor reads the distance in centimeters.
After that, we verify the interval that this distance is inserted and we activate a group of LEDs to signal the distance.
The greater the distance from the object to the funny robot, the greater the number of LEDs activated.
In addition to this code, a special case was developed, which will receive the ultrasonic sensor, resistors and LEDs. The Arduino will be connected externally.
The case of the funny robot is shown in the Figure below.
From the assembly of the circuit and the programming of the Arduino Uno, it is possible to store each of the LEDs used in the Lateral region of the teaching case, as well as to couple the ultrasonic sensor and the holes corresponding to the screws necessary to close the case.
This can be seen in the figure below.
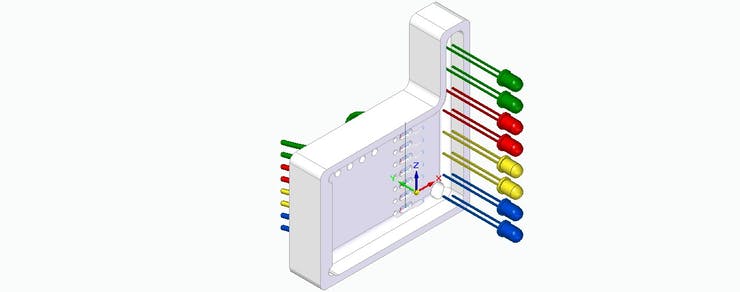
Right after, the back of the case will store the resistors chosen for the LED's. For this, a small cavity was modeled for each resistor, as shown in Figure below.
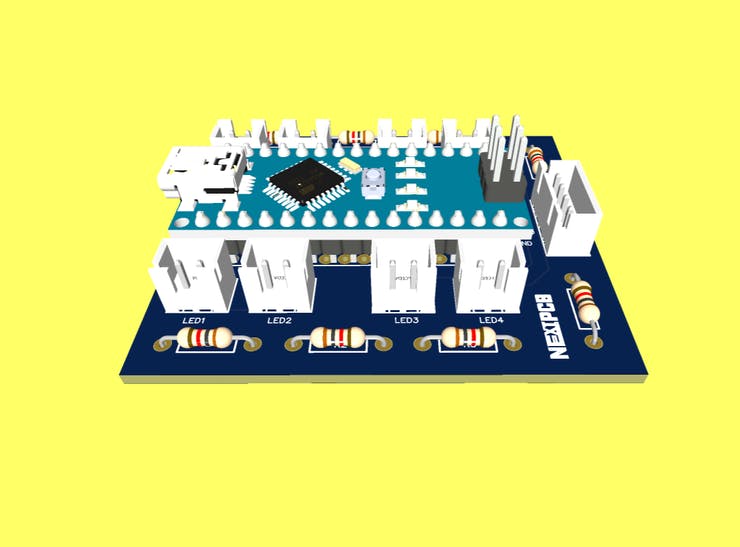
To finalize the control structure, we developed the NEXTPCB Printed Circuit Board. This board is intended to assist in programming the funny robot.
NEXTPCB Printed Circuit Board
This printed circuit board was developed from the following electronic schematic.
If you want, you can access the Gerber files and download them to produce your printed circuit board.
Conclusion
Therefore, from the development of this project, it was possible to know the structure of the HR-SR04 ultrasonic sensor and understand its operation, in addition to analyzing the communication with the NANO arduino.
As the sensor emits sonic bursts, it is experimentally concluded that there are cases in which these bursts are colliding with a structure with a non-uniform surface.
When this phenomenon occurs, it is possible that an error in the distance value occurs. You’ll notice that in some positions, more than one LED’s will go up.
Acknowledgment
We thank the NEXTPCB for providing the PCB for this project.
In addition, we would like to thank Escola Robô Lúdico of Brasil for the support and development of this project.
