Despite its simplicity, it has a relatively good sensitivity and perfect stability during operation
This time I will present you how to build a very simple Metal Detector. Despite its simplicity, it has a relatively good sensitivity and perfect stability during operation, so that there is no need for any calibration even during a long time of operation. Also, the dimensions and inductance of the detecting coil are not critical, and most importantly, it will surely work for you immediately after making it. This makes it an ideal metal detector for beginners.
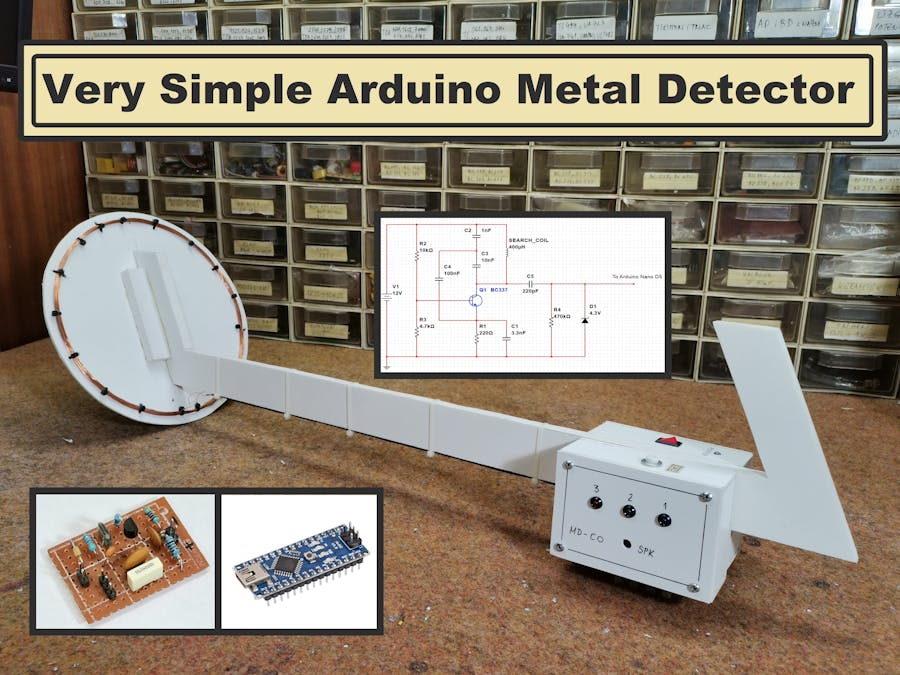
Basically, the project was taken over from the Silicon Junction blog, and I just added a sound indication for better control during metal detection. The detecting part is a simple Colpitts oscillator with the resonant circuit comprised of C2, C3 and SEARCH_COIL. This oscillator will have a frequency of approximately 260khz.
The complete device consists of several components:
- Arduino Nano microcontroller
- BC337 or similar NPN Transistor
Zener diode D1 is used to limit the voltage on the Arduino pin to a safe 4.3V. C5 and R4 ensures the output of the oscillator is referenced to ground.
Any coil with an inductance around 200-400uH should work, and you should try and keep the resistance fairly low. This will give you a frequency around 200-400 khz, which falls within a range the arduino can handle. I used a coil with a diameter of 20cm and contains 25 turns, but the detector also worked quite correctly with two concentrically placed coils with a diameter of 12 and 23cm, both of which had 25 turns and are connected in series.
The Arduino code counts every 100 milliseconds how many pulses have occurred and stores this as baseline. In the main loop Count how many pulses occurred in 100 milliseconds, store this as count. If count has changed from the baseline in turn on a LED, and activates the buzzer. This means that the detector is calibrated continuously every 100 milliseconds. The code is relatively simple thanks to the FreqCount library which you can also download from the given links.
The advantage of this type of code is that in order for the device to work, no adjustments or calibrations need to be made, but the downside is that in order to detect the metal object, there needs to be movement of the object in relation to the coil or vice versa.
#include <FreqCount.h>

//the baseline frequency of the main search coil
unsigned long baseLine = 0;

//Pins red, green and blue LEDs are attached to.
const int bluePin = A2;
const int greenPin = A4;
const int redPin = A5;
const int buzzerPin = 12;


void setup() {
  //set our LED pins as outputs
  pinMode(redPin,OUTPUT);
  pinMode(greenPin,OUTPUT);
  pinMode(bluePin,OUTPUT);
  pinMode(buzzerPin,OUTPUT);
  //Flash a sequence to test the LEDs and show we are starting up
  digitalWrite(redPin,HIGH);
  delay(200);
  silence();
  digitalWrite(greenPin,HIGH);
  delay(200);
  silence();
  digitalWrite(bluePin,HIGH);
  delay(200);
  silence();

  //Read out baseline frequency count, 100ms intervals
  FreqCount.begin(100);
  while(!FreqCount.available())
  {
    delay(10);
  }
  baseLine = FreqCount.read();

  if(baseLine > 10000)
  {
    //Green, we started up OK
    digitalWrite(greenPin,HIGH);
  }
  else
  {
    //Red, something went wrong, we didn't get a sensible count
    digitalWrite(redPin,HIGH);
  }
  delay(1000);

  silence();
}


void loop() {
  //no sample ready yet, exit.
  if (!FreqCount.available()) {
    return;
  }
  //Read how many pulses in 100 milliseconds
  unsigned long count = FreqCount.read();

  long difference =  baseLine - count;
  difference = abs(difference);

  //Difference is large, turn on the RED led
  if(difference > 5)
  {
    digitalWrite(greenPin,LOW);
    digitalWrite(bluePin,LOW);
    digitalWrite(redPin,HIGH);
    digitalWrite(buzzerPin,HIGH);
  }
  else if(difference > 2)  //medium difference, green
  {
    digitalWrite(greenPin,HIGH);
    digitalWrite(bluePin,LOW);
    digitalWrite(redPin,LOW);
    digitalWrite(buzzerPin,HIGH);
  }
  else if(difference > 1) //small difference, blue.
  {
    digitalWrite(greenPin,LOW);
    digitalWrite(bluePin,HIGH);
    digitalWrite(redPin,LOW);
    digitalWrite(buzzerPin,HIGH);
  }
  else
  {
    silence(); //no difference, turn off all LEDs
    digitalWrite(buzzerPin,LOW);
  }

  //Auto-adjust our baseline
  if(count > baseLine)
  {
    baseLine +=1;
  }
  else if (count < baseLine)
  {
     baseLine -= 1;
  }
}

  //Turn off all output pins
  void silence()
  {
    digitalWrite(redPin,LOW);
    digitalWrite(greenPin,LOW);
    digitalWrite(bluePin,LOW);
  }