This instrument produces tones or sounds based on the light that falls on the surface of the Photoresistor.
The Theremin is an electronic musical instrument controlled without physical contact by the thereminist (performer). It is named after its inventor, Leon Theremin, who patented the device in 1928.
This time I will show you how to make such an instrument that produces tones or sounds based on the light that falls on the surface of the Photoresistor. By moving your hand over the photoresistor, the intensity of light falling on it, changes, and that change the pitch. The device is very simple to build and can be successfully made by a beginner. It also does not require a separate power supply and is powered via the USB port of Arduino.
-------------------------------------------------------------------------
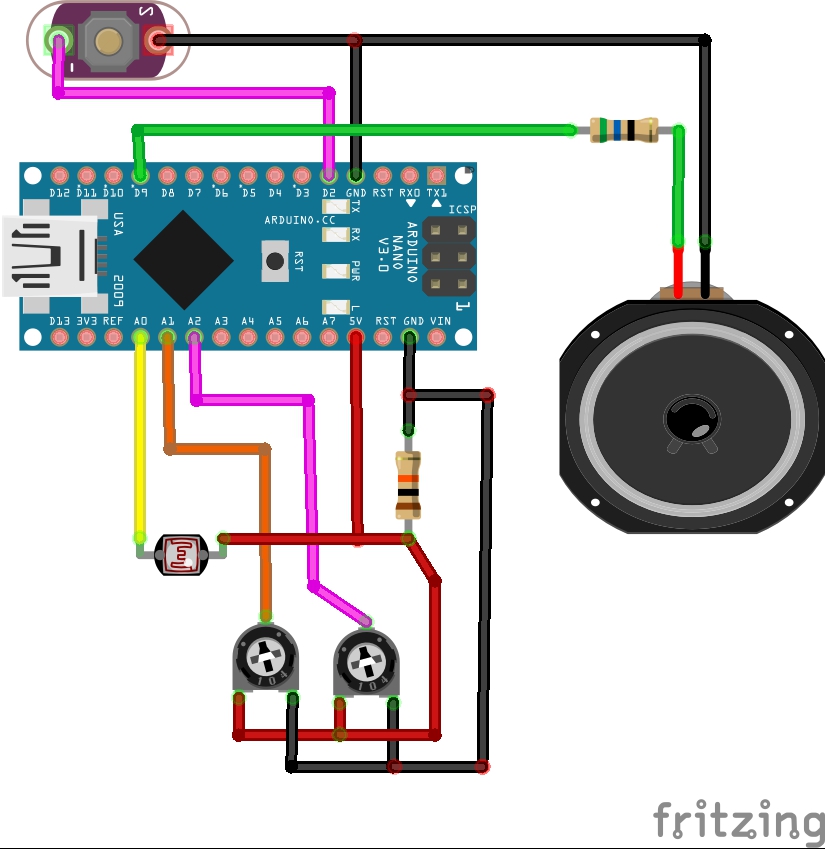
Contains only a few components:
- Arduino nano microcontroller
- Two trimmer potentiometers
In the sketch, the measured brightness is assigned a minimum and a maximum tone frequency (pitchMin and pitchMax). However, these values can still be changed during runtime with two trimmer potentiometers. An additional button switches between 4 different modes one after the other. When the program is started, a 440 Hz tone is output for 5 seconds. During this time, the LDR is calibrated, and the minimum and maximum incidence of light are measured. As soon as the calibration process is finished, the "no sound" mode starts and you only hear sounds when you have pressed the button.
Finally, the device is mounted in a suitable box made of PVC board, lined with colored wallpaper.
#define PIN_PIEZO    9
#define PIN_BUTTON   2
#define PIN_LDR      A0
#define PIN_POTI_MIN A1
#define PIN_POTI_MAX A2

#define CALIBRATION_DURATION 5 // in seconds

// Pitch definitions in Hz
#define PITCH_MIN_LOWER 5
#define PITCH_MIN_UPPER 170
#define PITCH_MAX_LOWER 20
#define PITCH_MAX_UPPER 1000

int sensorValue = 0, sensorMin = 700, sensorMax = 0;
int pitchMin = PITCH_MIN_LOWER, pitchMax = PITCH_MAX_LOWER;
unsigned long lastPressedButton = 0;
byte buttonState = 0;

void setup()
{
    pinMode(PIN_PIEZO, OUTPUT);
    pinMode(PIN_BUTTON, INPUT_PULLUP);
    pinMode(PIN_POTI_MIN, INPUT);
    pinMode(PIN_POTI_MAX, INPUT);

    tone(PIN_PIEZO, 440);
    while (millis() < (CALIBRATION_DURATION * 1000)) {
        sensorValue = analogRead(PIN_LDR);
        sensorMax = max(sensorValue, sensorMax);
        sensorMin = min(sensorValue, sensorMin);
    }
    noTone(PIN_PIEZO);
}

void loop()
{
    if ((millis() - lastPressedButton > 250) && digitalRead(PIN_BUTTON) == LOW) {
        lastPressedButton = millis();
        buttonState++;
        buttonState %= 5;
    }

    pitchMin = PITCH_MIN_LOWER + map(analogRead(PIN_POTI_MIN), 0, 1023, 0, PITCH_MIN_UPPER);
    pitchMin = constrain(pitchMin, PITCH_MIN_LOWER, PITCH_MIN_UPPER);
    pitchMax = PITCH_MAX_LOWER + map(analogRead(PIN_POTI_MAX), 0, 1023, 0, PITCH_MAX_UPPER);
    pitchMax = constrain(pitchMax, PITCH_MAX_LOWER, PITCH_MAX_UPPER);

    if (buttonState > 0) {
        sensorValue = analogRead(PIN_LDR);

        // apply the calibration to the sensor reading
        sensorValue = map(sensorValue, sensorMin, sensorMax, pitchMin, pitchMax);

        // in case the sensor value is outside the range seen during calibration
        sensorValue = constrain(sensorValue, pitchMin, pitchMax);

        tone(PIN_PIEZO, sensorValue);

        if (buttonState == 2) {
            delay(160);
        } else if (buttonState == 3) {
            delay(50);
        }
        else if (buttonState == 4) {
            delay(250);
        }
    } else {
        noTone(PIN_PIEZO);
    }
}