Let's see how to build an easy DIY Pedometer with the help of Arduino and accelerometer.
Summery
Let's see how to build an easy DIY Pedometer with the help of Arduino and accelerometer.
About Project
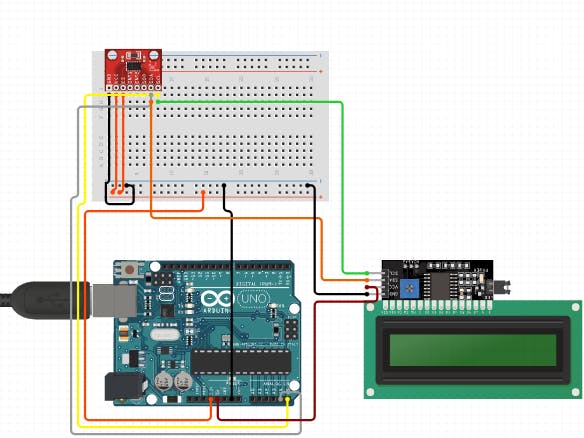
A pedometer is a device that is only utilized to count footsteps. It will count the total number of footsteps and show them on a 16x2 LCD module. It can be incorporated with Arduino Smart Watch.
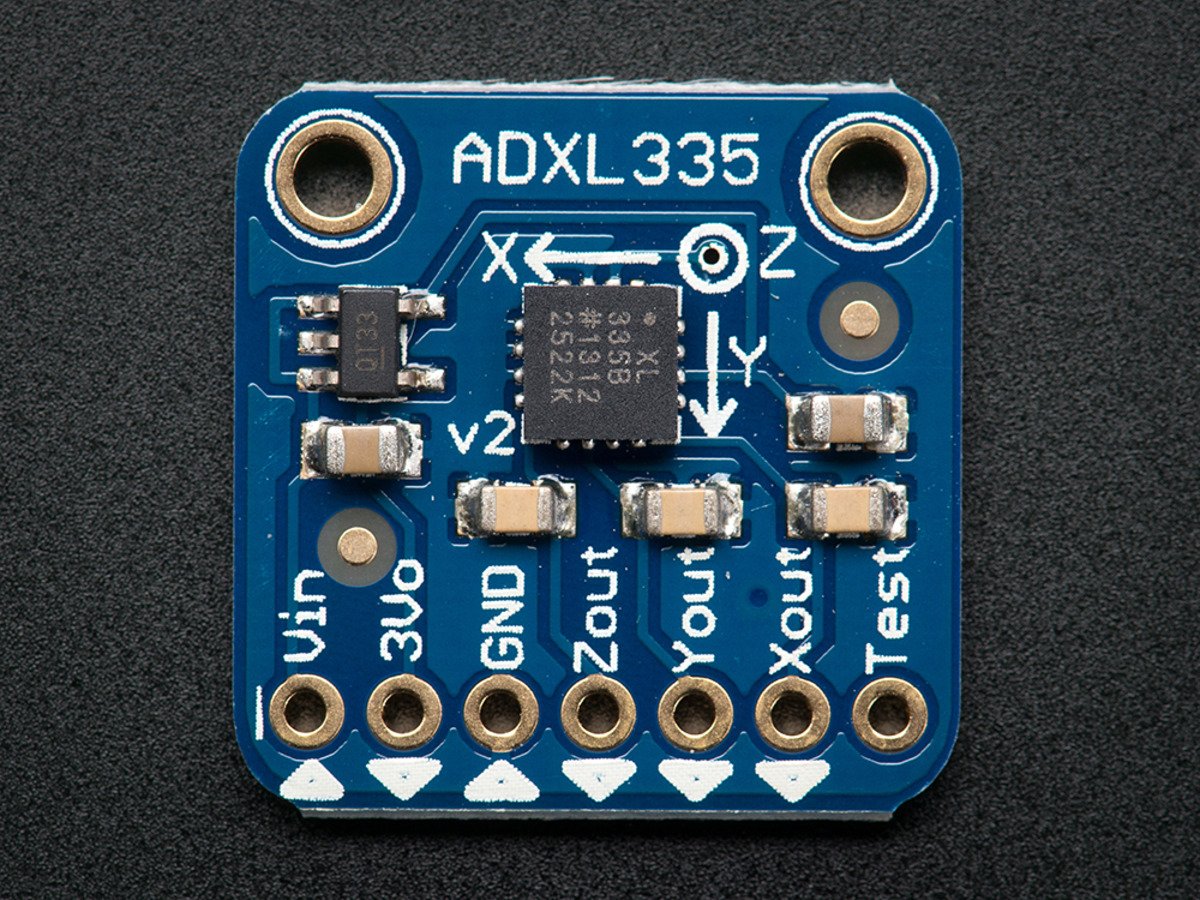
It is basically a complete 3-axis Analog accelerometer that works on capacitive sensing.ADXL335 accelerometer can estimate static and dynamic acceleration.
The working principle of this is to convert acceleration in any direction to its specific variable voltage.
It measures the total no of footsteps with the help of three components of motion that are forward, vertical as well as side. The pedometer system utilizes an accelerometer to obtain these values. Below are the steps that the pedometer follow:
- It starts the calibration as soon as it gets actuated at the initial level.
- Then it constantly gets the data from X, Y, and Z-axis.
- Then it estimates the total acceleration vector from the starting point.
- The acceleration vector is basically the square root of the X, Y, and Z-axis values.
- Then it differentiates the average acceleration values from the threshold values to calculate the total step number.
- If it crosses the threshold value, then it improves the step count.
In this way, it will work, enroll yourself in an IoT course to get a complete idea of such a project.
#include <LiquidCrystal_I2C.h>
LiquidCrystal_I2C lcd(0x27, 16, 2);
const int xpin = A1;
const int ypin = A2;
const int zpin = A3;
byte p[8] = {
  0x1F,
  0x1F,
  0x1F,
  0x1F,
  0x1F,
  0x1F,
  0x1F,
  0x1F
};
float threshold = 6;
float xval[100] = {0};
float yval[100] = {0};
float zval[100] = {0};
float xavg, yavg, zavg;
int steps, flag = 0;
void setup()
{
  Serial.begin(9600);
  lcd.begin();
  lcd.backlight();
  lcd.clear();
  calibrate();
}
void loop()
{
  for (int w = 0; w < 16; w++) {
    lcd.write(byte(0));
    delay(500);
  }
  int acc = 0;
  float totvect[100] = {0};
  float totave[100] = {0};
  float xaccl[100] = {0};
  float yaccl[100] = {0};
  float zaccl[100] = {0};
  for (int a = 0; a < 100; a++)
  {
    xaccl[a] = float(analogRead(xpin) - 345);
    delay(1);
    yaccl[a] = float(analogRead(ypin) - 346);
    delay(1);
    zaccl[a] = float(analogRead(zpin) - 416);
    delay(1);
    totvect[a] = sqrt(((xaccl[a] - xavg) * (xaccl[a] - xavg)) + ((yaccl[a] - yavg) * (yaccl[a] - yavg)) + ((zval[a] - zavg) * (zval[a] - zavg)));
    totave[a] = (totvect[a] + totvect[a - 1]) / 2 ;
    Serial.println("totave[a]");
    Serial.println(totave[a]);
    delay(100);
    if (totave[a] > threshold && flag == 0)
    {
      steps = steps + 1;
      flag = 1;
    }
    else if (totave[a] > threshold && flag == 1)
    {
      // Don't Count
    }
    if (totave[a] < threshold   && flag == 1)
    {
      flag = 0;
    }
    if (steps < 0) {
      steps = 0;
    }
    Serial.println('\n');
    Serial.print("steps: ");
    Serial.println(steps);
    lcd.print("Steps: ");
    lcd.print(steps);
    delay(1000);
    lcd.clear();
  }
  delay(1000);
}
void calibrate()
{
  float sum = 0;
  float sum1 = 0;
  float sum2 = 0;
  for (int i = 0; i < 100; i++) {
    xval[i] = float(analogRead(xpin) - 345);
    sum = xval[i] + sum;
  }
  delay(100);
  xavg = sum / 100.0;
  Serial.println(xavg);
  for (int j = 0; j < 100; j++)
  {
    yval[j] = float(analogRead(ypin) - 346);
    sum1 = yval[j] + sum1;
  }
  yavg = sum1 / 100.0;
  Serial.println(yavg);
  delay(100);
  for (int q = 0; q < 100; q++)
  {
    zval[q] = float(analogRead(zpin) - 416);
    sum2 = zval[q] + sum2;
  }
  zavg = sum2 / 100.0;
  delay(100);
  Serial.println(zavg);
}