This example makes the servo to rotate from degree 0 to 180, and then rotate back to degree 0.
A typical servo has 3 wires, the red wire is for power, black or brown one should be connected to GND, and the other one is for signal data. We use PWM signal to control the rotation angle of the axis of the servo. The frequency of the signal is 50Hz, that is length 20ms. Each servo defines its pulse bandwidth, which is usually 1ms~2ms.
To control the rotation angle, for example if 1ms-length pulse rotates the axis to degree 0, then 1.5 ms pulse rotates the axis to 90 degrees, and 2 ms pulse rotates the axis to 180 degrees. Furthermore, a servo defines the “dead bandwidth”, which stands for the required minimum difference of the length of two consecutive pulse for the servo to work.
RTL8722DM_MINI
Ameba RTL8722DM is a low-power dual-band WLAN and Bluetooth Low Energy SoC by Realtek. The RTL8722DM also include memory for Wi-Fi protocol functions and application making it simple for anyone to develop various kind of IoT applications. At the same time it has a wide range of peripheral interfaces. With all these interfaces, it can connect to most of the electronics components like LEDs, temperature and humidity sensors, and so on.
More Resources:
If you need additional technical documents or the source code for this project. Please visit the official websites and join the Facebook group and forum.
Ameba Official Website: https://www.amebaiot.com/en/
Ameba Facebook Group: https://www.facebook.com/groups/amebaioten
Ameba Forum: https://forum.amebaiot.com/
Setup
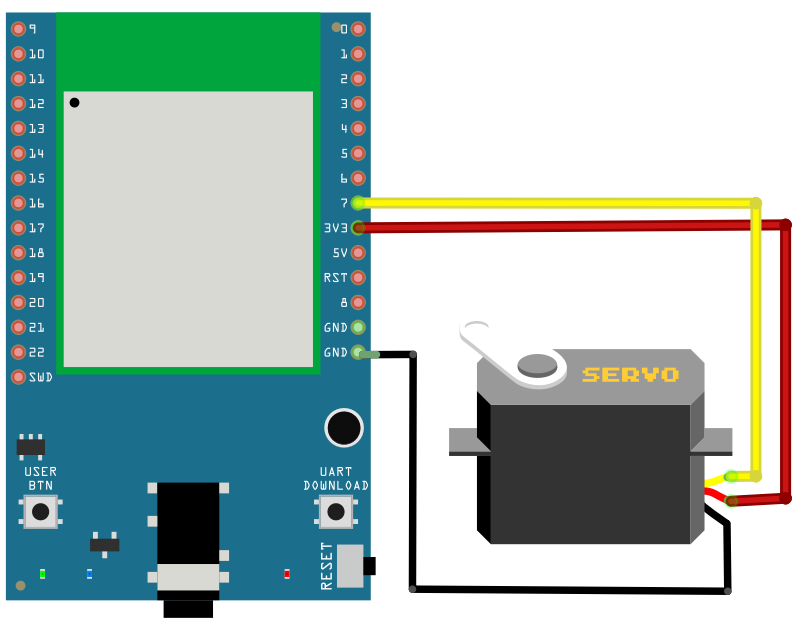
Connect the servo to the RTL8722DM_MINI as shown below
Open the example, “File” -> “Examples” -> “AmebaAnalog” -> “ServoSweep”
Final Result
This example makes the servo to rotate from degree 0 to 180, and then rotate back to degree 0.