Keep an eye on your battery's charge level with this simple Arduino-based battery level monitor.
This article will teach you how to build an Arduino-based voltage indicator. The indicator shows the status of the battery by lighting LEDs on a LED Bar Graph depending on the battery voltage reading. But if you don't have a LED Bar Graph available, you can always use ordinary LEDs like what I used on this project.
Why Battery Level Monitoring is Important
Have you experienced building a battery-operated project then suddenly it won't work because it needs to be charged?
We all know that batteries come with a certain voltage limit. Exceeding or completely losing the battery’s voltage can lead to a lot of frustration, component damage, or data loss. So wouldn't it be nice to be able to monitor the battery’s level so you can decide whether it needs to be charged or replaced? That’s what this reader will do for you!
Materials Needed
- Arduino Uno
- 16 x 2 LCD Display
- LED Bar Graph/ 10 LED bulbs
- Arduino IDE
- 4 x 1.2V Battery
- Battery Holder
What is a LED Bar Graph?
The LED bar graph is an LED array of 10 individual LEDs with 10 output pins. It has various applications including audio equipment and industrial control panel.
In our project, we will use it as a battery level indicator. Like any other LED, when connecting the LED bar to your microcontroller, you have to connect the anode pins to the positive side and the cathode pin using a resistor at the end to ground.
How Does This Project Measure the Battery Level?
It is good to understand that batteries have what we call a level of charge. It can be understood as the amount of voltage contained in your battery.
The Arduino's analog pin acts as a simple voltmeter where the voltage value is retrieved. Then, we can convert the analog value into a digital voltage value by using the ADC conversion formula.
The values we convert will display on the LED bar graph where it can project the strength. So, if all ten LEDs are lit, the battery is at full strength. If only five LEDs are on, the batter is at half strength.
The Arduino Uno ADC is of 10-bit resolution. The ADC converter will map input voltages between 0 and 5 volts into integer values between 0 and 1023. So if we multiply input analogValue to (5/1024), then we get the digital value of input voltage.
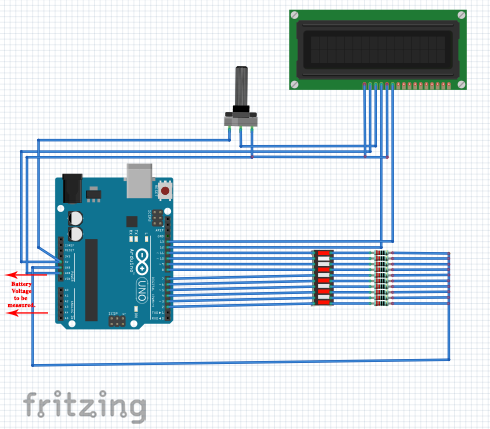
Project Schematic
Below is the schematic for the build.
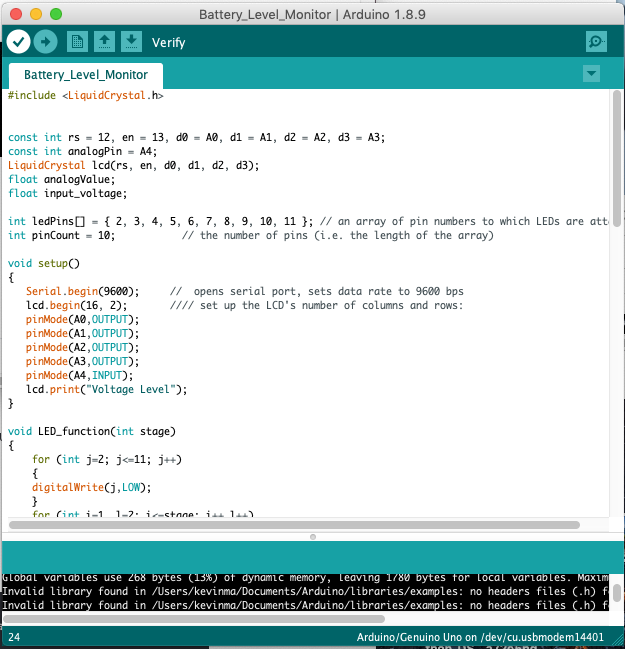
Battery Level Monitor Code Walkthrough
First, we need to define the LCD Library and specify the pins we are going to use with the Arduino. We assigned analog pin A4 as the analog pin for checking the battery voltage. The values are set in float so we can get the voltage values up to two decimal places.
#include <LiquidCrystal.h>
const int rs = 12, en = 13, d0 = A0, d1 = A1, d2 = A2, d3 = A3;
const int analogPin = A4;
LiquidCrystal lcd(rs, en, d0, d1, d2, d3);
float analogValue;
float input_voltage;
Then, we create an array for assigning the pins to the LED Bar graph. The array of pin numbers to which LEDs are attached.
int ledPins[] = { 2, 3, 4, 5, 6, 7, 8, 9, 10, 11 }; // The LEDs attach to this array of pin numbers
int pinCount = 10;           // the number of pins
We set up the LCD and analog pins as OUTPUT pins.
void setup()
{
   Serial.begin(9600);     //  opens serial port, sets data rate to 9600 bps
   lcd.begin(16, 2);       //// set up the LCD's number of columns and rows:
   pinMode(A0,OUTPUT);
   pinMode(A1,OUTPUT);
   pinMode(A2,OUTPUT);
   pinMode(A3,OUTPUT);
   pinMode(A4,INPUT);
   lcd.print("Voltage Level");
}
Next, we create a function, LED_function, for using the LED bar graph.
void LED_function(int stage)
{
    for (int j=2; j<=11; j++)
    {
    digitalWrite(j,LOW);
    }
    for (int i=1, l=2; i<=stage; i++,l++)
    {
    digitalWrite(l,HIGH);    //delay(30);
    }
}
Once we have the function, we need a way to convert the analog values into digital voltage values. By using the built-in analog to digital converter of Arduino and the ADC conversion formula, we will be able to convert the values easily. We also want to display those converted values on our LCD display.
//  Conversion formula for voltage
  analogValue = analogRead (A4);
  Serial.println(analogValue);
  delay (1000);
  input_voltage = (analogValue * 5.0) / 1024.0;
  lcd.setCursor(0, 1);
  lcd.print("Voltage= ");
  lcd.print(input_voltage);
  Serial.println(input_voltage);
  delay(100);
We then create some conditions to control the LED bar graph with respect to the value of the input voltage we read from the analog pin A4.
if (input_voltage < 0.50 && input_voltage >= 0.00 )
    {
    digitalWrite(2, HIGH);
    delay (30);
    digitalWrite(2, LOW);
    delay (30);
    }
  else if (input_voltage < 1.00 && input_voltage >= 0.50)
    {
    LED_function(2);
    }
  else if (input_voltage < 1.50 && input_voltage >= 1.00)
    {
    LED_function(3);
    }
  else if (input_voltage < 2.00 && input_voltage >= 1.50)
    {
    LED_function(4);
    }
  else if (input_voltage < 2.50 && input_voltage >= 2.00)
    {
    LED_function(5);
    }
  else if (input_voltage < 3.00 && input_voltage >= 2.50)
    {
    LED_function(6);
    }
  else if (input_voltage < 3.50 && input_voltage >= 3.00)
    {
    LED_function(7);
    }
  else if (input_voltage < 4.00 && input_voltage >= 3.50)
    {
    LED_function(8);
    }
  else if (input_voltage < 4.50 && input_voltage >= 4.00)
    {
    LED_function(9);
    }
  else if (input_voltage < 5.00 && input_voltage >= 4.50)
    {
    LED_function(10);
    }
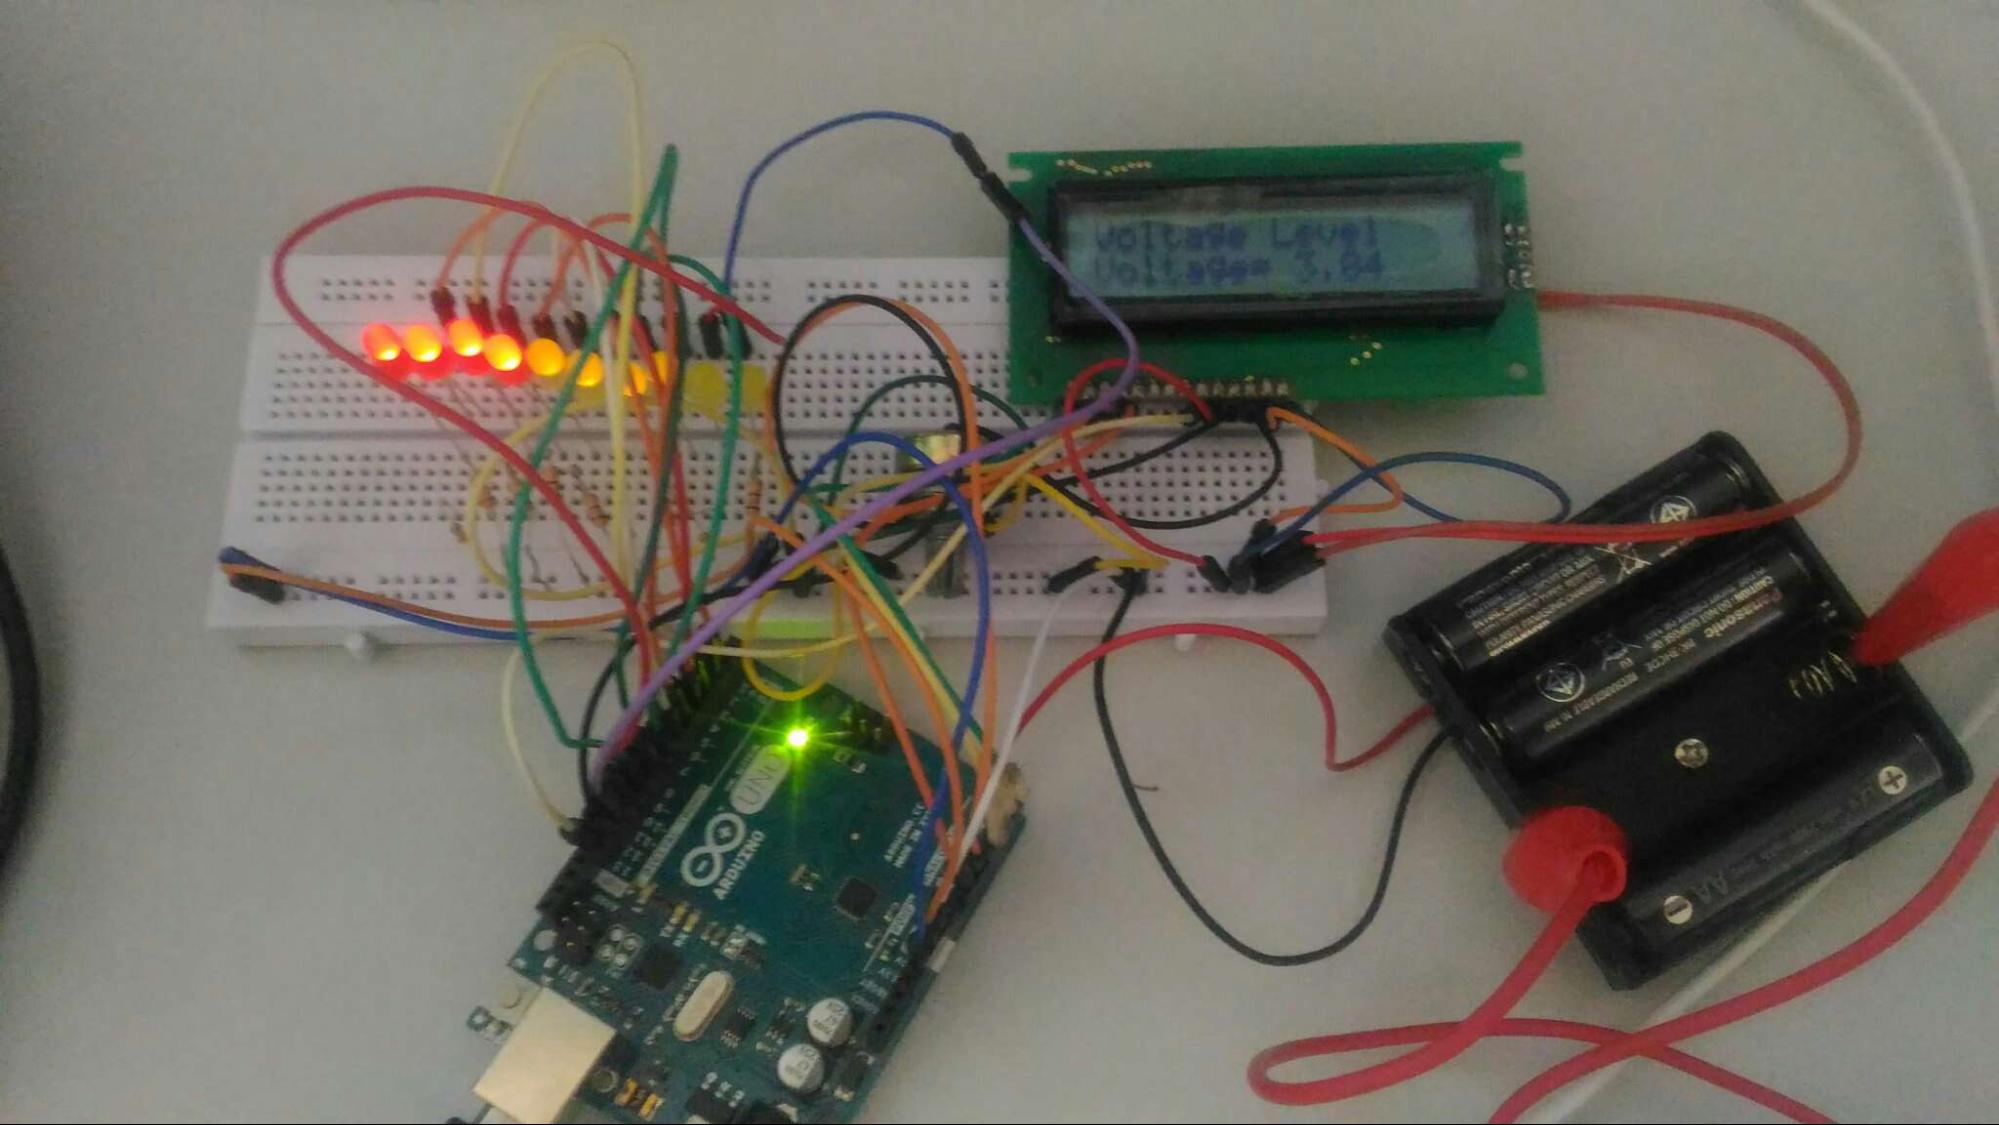
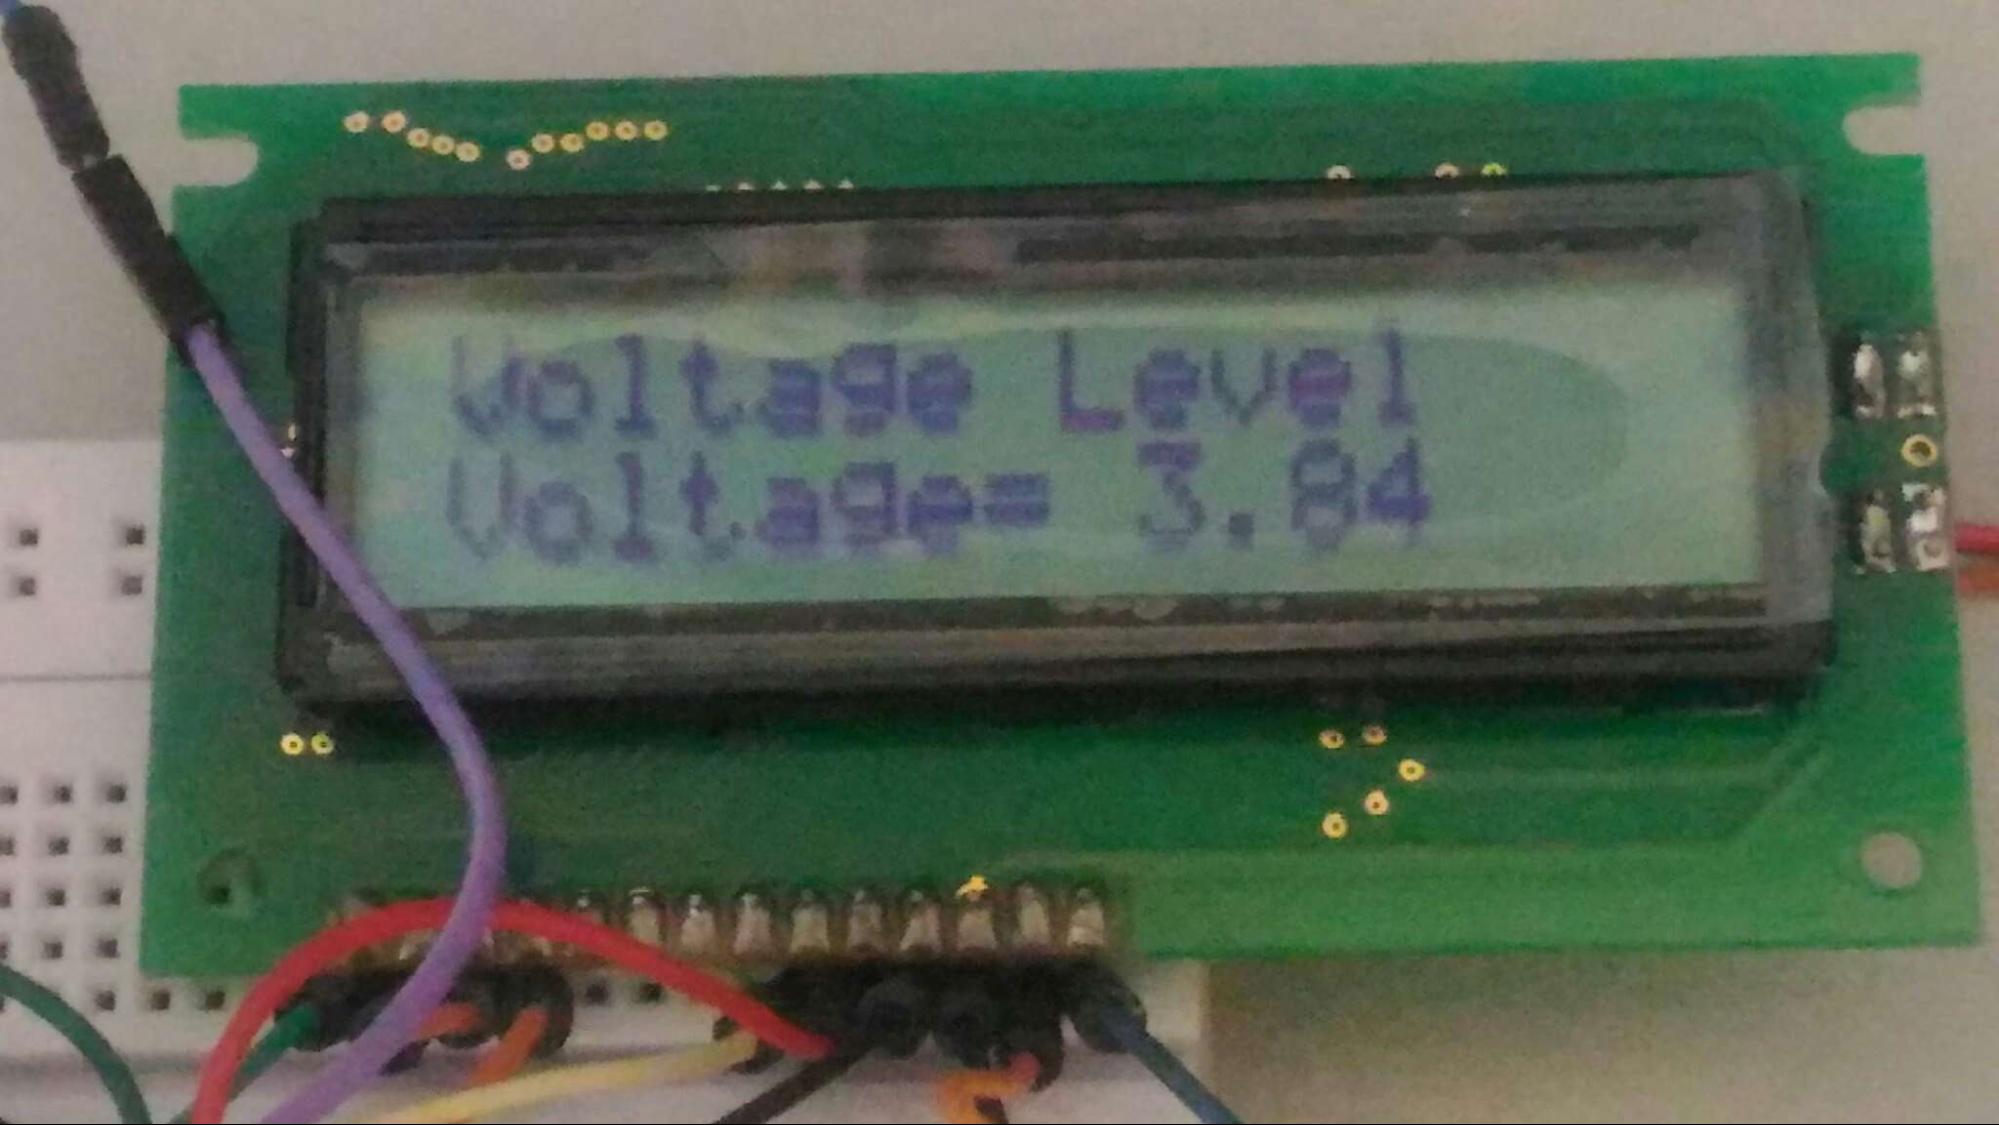
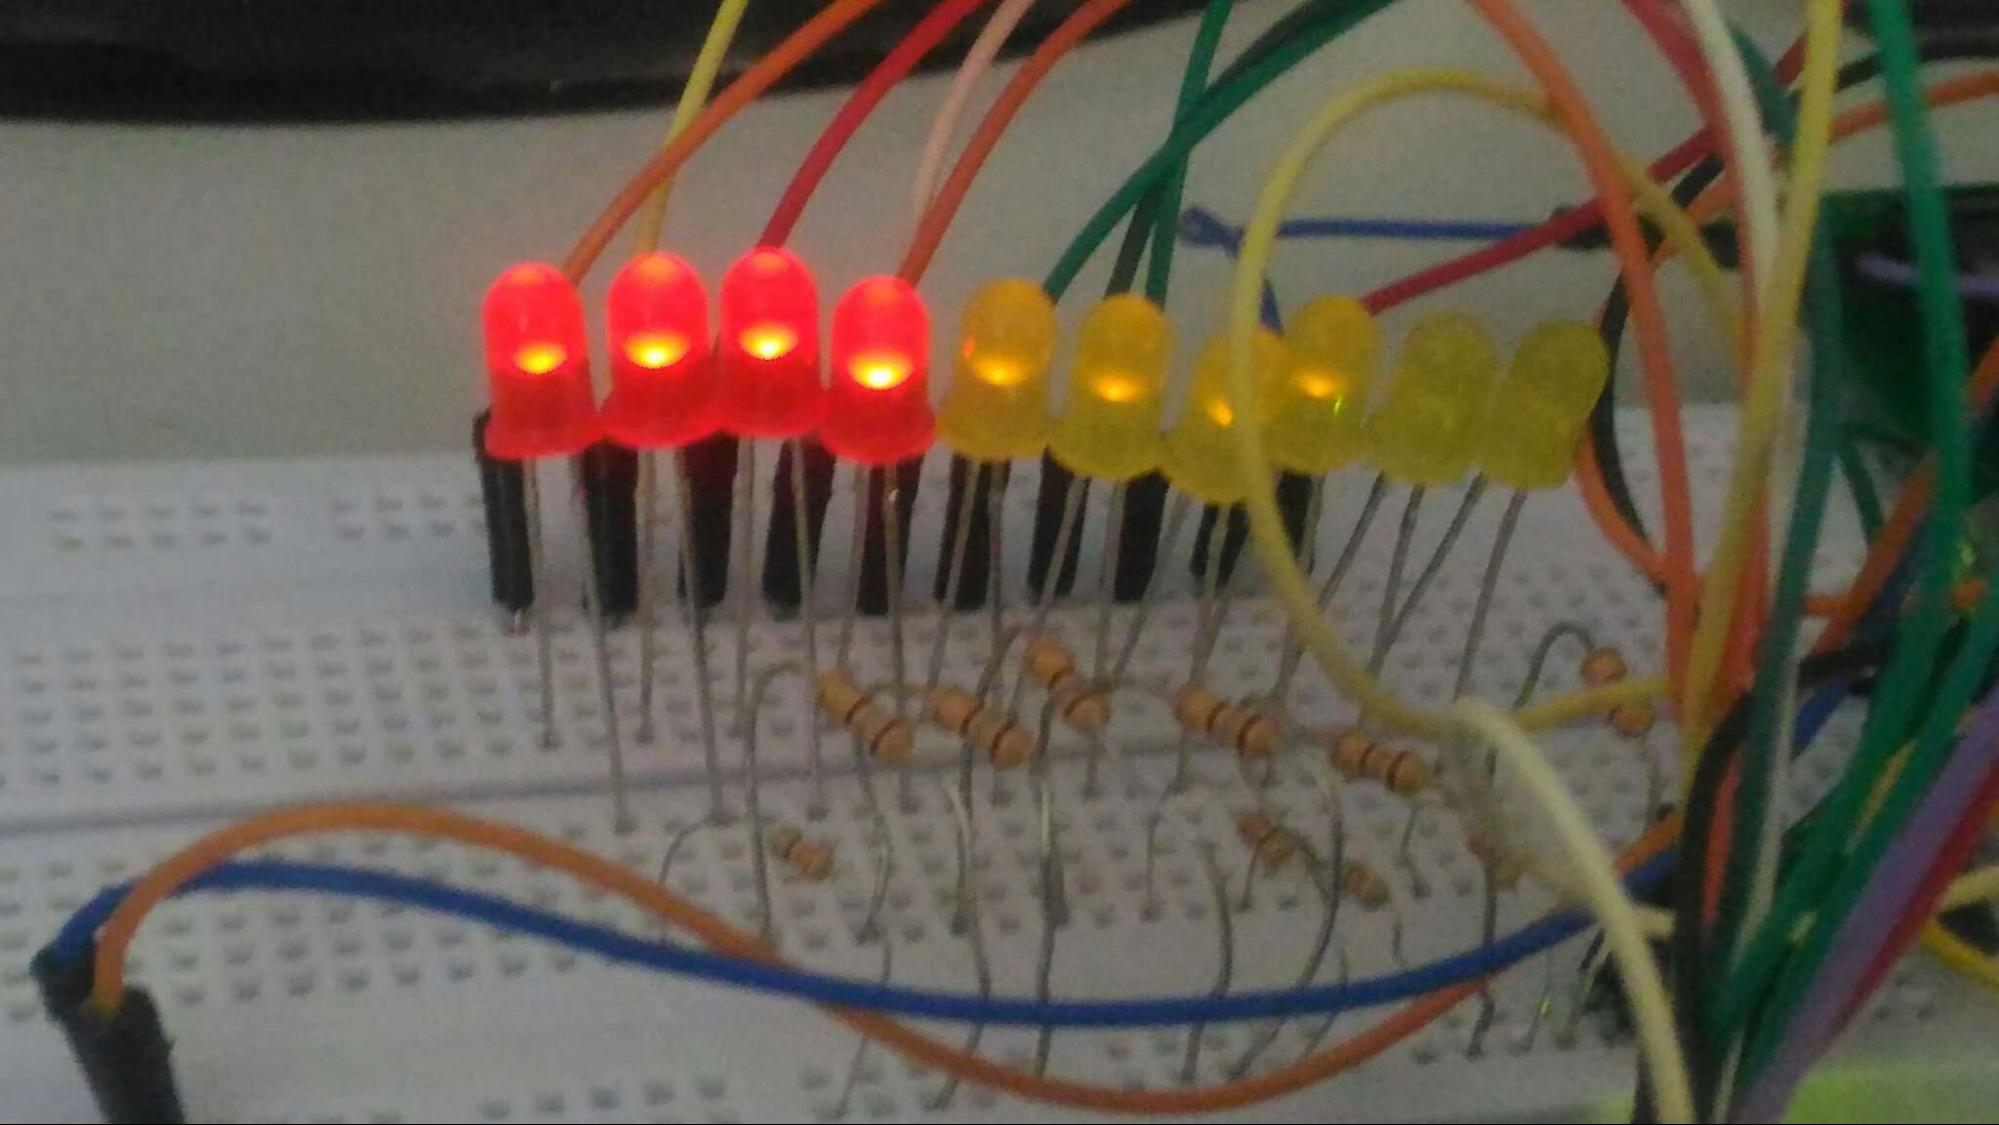
In the image above, you can see we get an almost fully charged battery reading that equates to approximately 3.84V.
Full Project Code
#include <LiquidCrystal.h>


const int rs = 12, en = 13, d0 = A0, d1 = A1, d2 = A2, d3 = A3;
const int analogPin = A4;
LiquidCrystal lcd(rs, en, d0, d1, d2, d3);
float analogValue;
float input_voltage;

int ledPins[] = { 2, 3, 4, 5, 6, 7, 8, 9, 10, 11 }; // an array of pin numbers to which LEDs are attached
int pinCount = 10;           // the number of pins (i.e. the length of the array)

void setup()
{
   Serial.begin(9600);     //  opens serial port, sets data rate to 9600 bps
   lcd.begin(16, 2);       //// set up the LCD's number of columns and rows:
   pinMode(A0,OUTPUT);
   pinMode(A1,OUTPUT);
   pinMode(A2,OUTPUT);
   pinMode(A3,OUTPUT);
   pinMode(A4,INPUT);
   lcd.print("Voltage Level");
}

void LED_function(int stage)
{
    for (int j=2; j<=11; j++)
    {
    digitalWrite(j,LOW);
    }
    for (int i=1, l=2; i<=stage; i++,l++)
    {
    digitalWrite(l,HIGH);    //delay(30);
    }

}
void loop()
{
//  Conversion formula for voltage
  analogValue = analogRead (A4);
  Serial.println(analogValue);
  delay (1000);
  input_voltage = (analogValue * 5.0) / 1024.0;
  lcd.setCursor(0, 1);
  lcd.print("Voltage= ");
  lcd.print(input_voltage);
  Serial.println(input_voltage);
  delay(100);

  if (input_voltage < 0.50 && input_voltage >= 0.00 )
    {
    digitalWrite(2, HIGH);
    delay (30);
    digitalWrite(2, LOW);
    delay (30);
    }
  else if (input_voltage < 1.00 && input_voltage >= 0.50)
    {
    LED_function(2);
    }
  else if (input_voltage < 1.50 && input_voltage >= 1.00)
    {
    LED_function(3);
    }
  else if (input_voltage < 2.00 && input_voltage >= 1.50)
    {
    LED_function(4);
    }
  else if (input_voltage < 2.50 && input_voltage >= 2.00)
    {
    LED_function(5);
    }
  else if (input_voltage < 3.00 && input_voltage >= 2.50)
    {
    LED_function(6);
    }
  else if (input_voltage < 3.50 && input_voltage >= 3.00)
    {
    LED_function(7);
    }
  else if (input_voltage < 4.00 && input_voltage >= 3.50)
    {
    LED_function(8);
    }
  else if (input_voltage < 4.50 && input_voltage >= 4.00)
    {
    LED_function(9);
    }
  else if (input_voltage < 5.00 && input_voltage >= 4.50)
    {
    LED_function(10);
    }
}
Now you don’t need to be worried about your batteries running low unexpectedly. Hope this helps with your next battery-powered project!