Hi guys, in this project, we will learn how to use the photo interrupter module with Arduino.
The photo interrupter module Keyes KY-010 for Arduino will trigger a signal when light between the sensor's gap is blocked.
The KY-010 photo interrupter module consists of an optical emitter/detector in the front and two resistors (1 kΩ and 33 Ω) in the back. The sensor uses a beam of light between emitter and detector to check if the path between both is being blocked by an opaque object.
Step 1: Things You Need
For this instructable, we will need following things :
- Arduino Uno
- Photo Interrupter Module
- Connecting Wires
- Breadboard
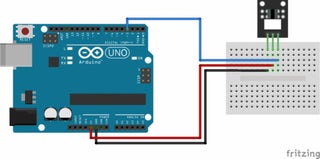
Step 2: Schematics
Connect the power line (middle) and ground (left) to +5V and GND respectively. Connect signal (S) to pin 3 on the Arduino.
KY-010 - Arduino
- (left) - GND
middle - +5V
S (right) - Pin 3
Step 3: Code
Please copy the following code and upload it to your Arduino Board :
int Led = 13; // define LED pin
int buttonpin = 3; // define photo interrupter signal pin
int val; //define a numeric variable

void setup()
{
pinMode(Led, OUTPUT); // LED pin as output
pinMode(buttonpin, INPUT); //photo interrupter pin as input
}

void loop()
{
val=digitalRead(buttonpin); //read the value of the sensor
if(val == HIGH) // turn on LED when sensor is blocked
{
digitalWrite(Led,HIGH);
}
else
{
digitalWrite(Led,LOW);
}
}
Step 4: Testing Photo Interrupter Module
The Arduino will light up the LED (pin 13) on the Arduino when there's an object blocking the beam of light between the sensor's gap.