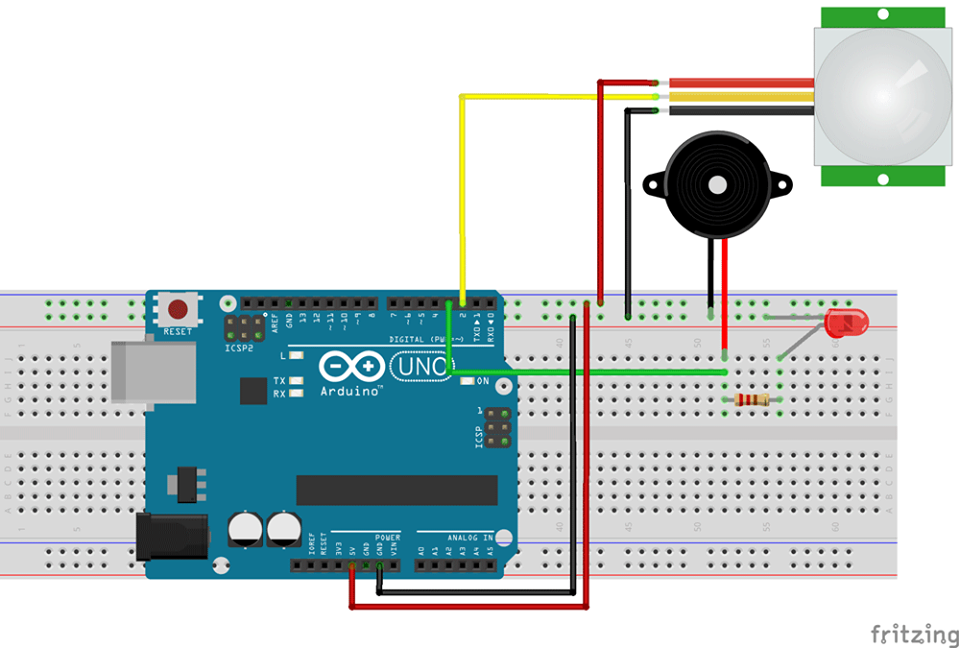
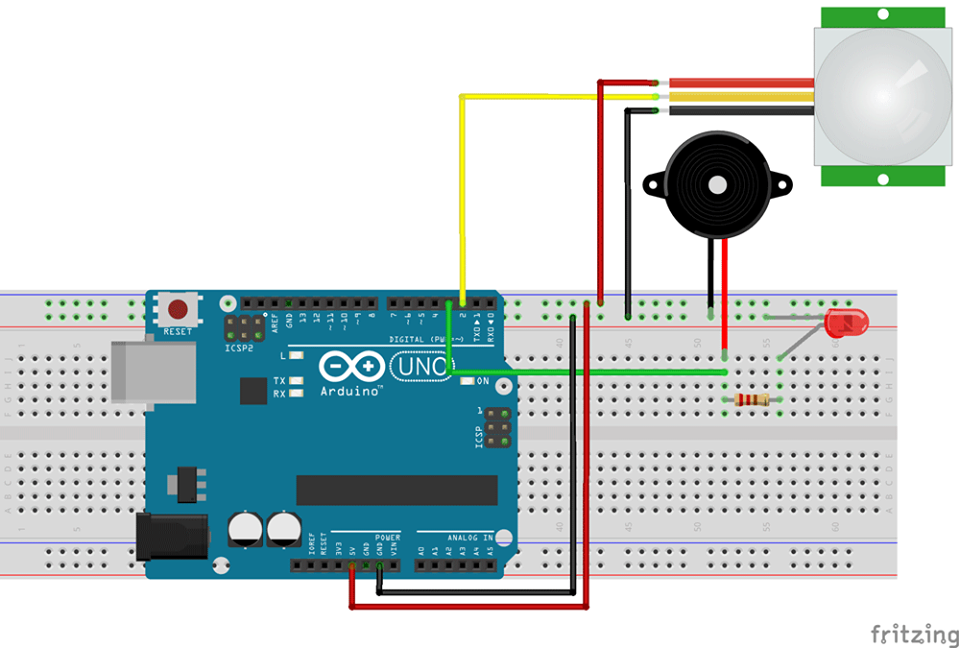
This post shows a simple example on how to use the PIR motion sensor with the Arduino
Arduino Motion Detector in easy process using PIR Sensor
Materials Required:
PIR Sensor Module
Arduino UNO (any version)
LED
Buzzer
Breadboard
Connecting Wires
330 ohm resistor
Introducing the PIR Motion Sensor
The PIR motion sensor is ideal to detect movement. PIR stand for “Passive Infrared”. Basically, the PIR motion sensor measures infrared light from objects in its field of view.
So, it can detect motion based on changes in infrared light in the environment. It is ideal to detect if a human has moved in or out of the sensor range.
void setup() {
pinMode(2, INPUT); //Pin 2 as INPUT
pinMode(3, OUTPUT); //PIN 3 as OUTPUT
}

void loop() {
if (digitalRead(2) == HIGH)
{
digitalWrite(3, HIGH); // turn the LED/Buzz ON
delay(100); // wait for 100 msecond
digitalWrite(3, LOW); // turn the LED/Buzz OFF
delay(100); // wait for 100 msecond
}
}
Arduino with PIR motion sensor
    For complete project details, visit: http://RandomNerdTutorials.com/pirsensor
    Modified by Rui Santos based on PIR sensor by Limor Fried
*/

int led = 13;                // the pin that the LED is atteched to
int sensor = 2;              // the pin that the sensor is atteched to
int state = LOW;             // by default, no motion detected
int val = 0;                 // variable to store the sensor status (value)

void setup() {
  pinMode(led, OUTPUT);      // initalize LED as an output
  pinMode(sensor, INPUT);    // initialize sensor as an input
  Serial.begin(9600);        // initialize serial
}

void loop(){
  val = digitalRead(sensor);   // read sensor value
  if (val == HIGH) {           // check if the sensor is HIGH
    digitalWrite(led, HIGH);   // turn LED ON
    delay(100);                // delay 100 milliseconds

    if (state == LOW) {
      Serial.println("Motion detected!");
      state = HIGH;       // update variable state to HIGH
    }
  }
  else {
      digitalWrite(led, LOW); // turn LED OFF
      delay(200);             // delay 200 milliseconds

      if (state == HIGH){
        Serial.println("Motion stopped!");
        state = LOW;       // update variable state to LOW
    }
  }
}
Wrapping Up
This post shows a simple example on how to use the PIR motion sensor with the Arduino. Now, you can use the PIR motion sensor in more advanced projects. For example, you can build a Night Security Light project.


