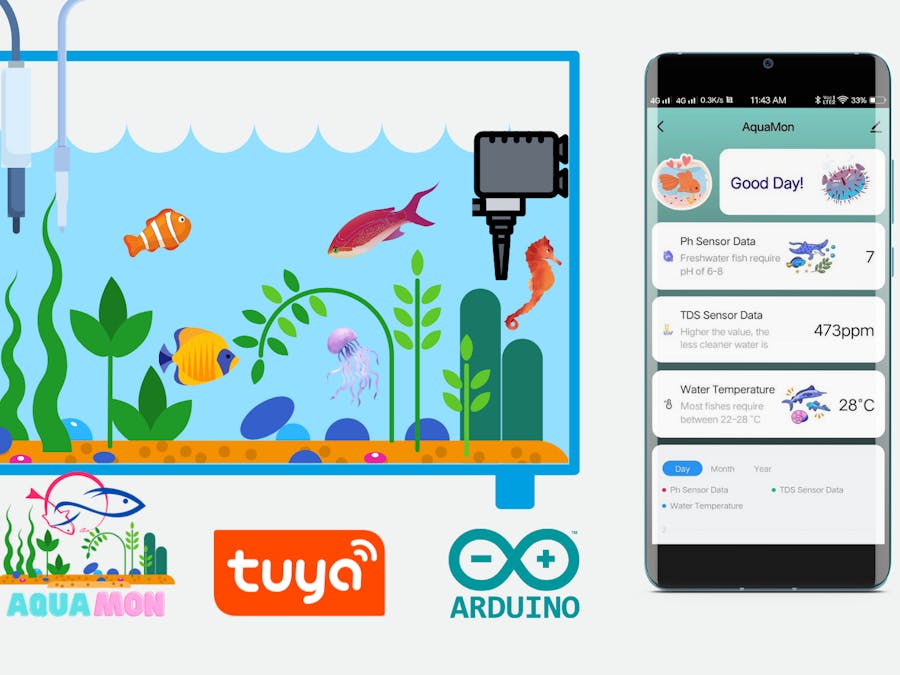
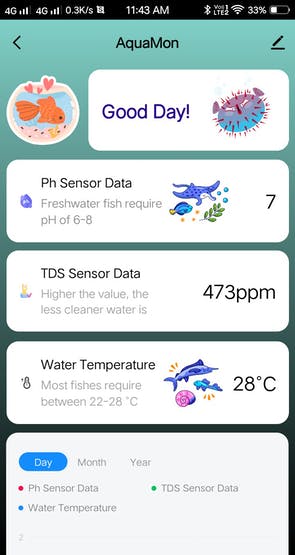
Marine species are extremely sensitive to changes in environmental conditions. AquaMon IoT device and app helps your fishes to grow better.
You might have come across several such IoT based aquarium monitoring projects from simple to advanced ones but I made this project to help people with no or lesser technical knowledge to set up one such aquarium IoT device with Android and iOS app having secure authorization built-in support as well.
What is Tuya and Why?
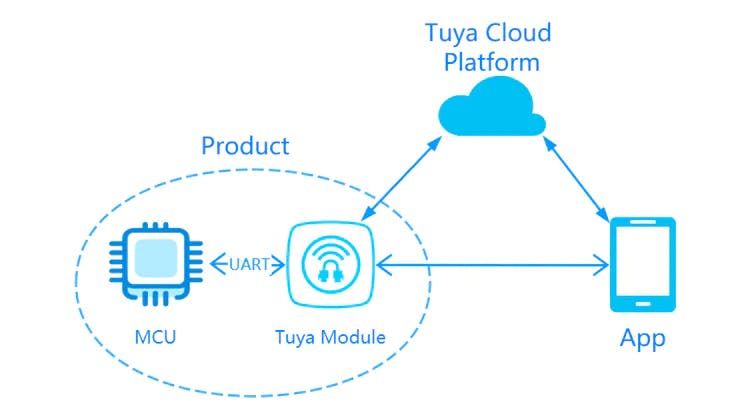
Tuya is a leading global IoT Cloud Platform that connects the intelligent needs of brands, OEMs, developers, and retail chains. The platform provides developers with a one-stop IoT PaaS-level solution that contains hardware development tools, global cloud services, and smart business platform development, Tuya offers comprehensive ecosystem empowerment from technology to marketing channels to build the world’s leading IoT Cloud Platform. Tuya is open to all, join as a beta tester and developer with their recent Arduino Library and Tuya Development kits release. Sign up and join the Tuya Developer Arduino Beta Test
I decided to use the Tuya IoT platform because it is simple, powerful, and can run on cheap modules like Esp8266. Also, the Tuya IoT platform gives you a drag-and-drop MIT app inventor-like feature to build your own IoT android and iOS mobile app on the go. So, your prototype can be the next smarter IoT product with the Tuya platform.
For more details on Tuya, check out my previous project on Introduction to Tuya IoT platform: https://steptostem.com/2021/08/getting-started-with-arduino-iot-control-with-tuya-iot-platform/
Let's build it
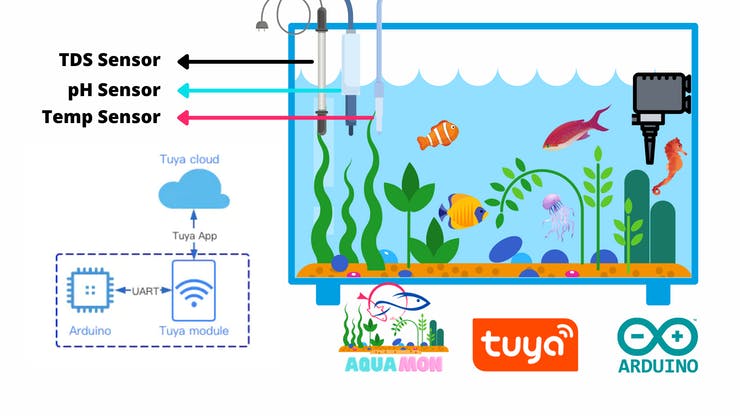
There are 3 sensors available to measure the key parameters in the fish tank such as temperature, pH, and TDS. In addition, you can add many different actuators to automate tasks such as heating or cooling the water, feeding the fish, activating the pumps for water change or medicines administration, and controlling the intensity of the light to simulate the day/night circles. I will go into detail in this article.
pH sensor: pH measures the acidity or alkalinity of water. A pH value of 7 is neutral, with lower numbers increasing in acidity and higher numbers increasing in alkalinity. Many fish can thrive in a range of pH conditions, typically spanning 6.5 to 7.5 pH. However, some fish require specific pH conditions outside this range. However, pH can drift over time, so testing aquarium water regularly is important. Most of the time, if left alone, pH levels will decrease over time due to the addition of acids into the water. Where could these acids be coming from?
Here are a few common sources:
1. Carbon dioxide in the air dissolving in the tank2. Tannins leeching into the water from plant matter3. Waste digesting bacteria acidifying the tank through the nitrogen cycle
Unfortunately, there are no visible indications that any change has taken place, so frequent monitoring is the only way to ensure that water remains healthy and inhabitable.
TDS Sensor: TDS measures the total dissolved solids of the solution or the concentration of dissolved solid particles. In general, the higher the TDS value, the more soluble solids dissolved in water, and the less clean the water is. Therefore, TDS can be used as one of the references for reflecting the cleanliness of the water.
Temperature Sensor: Aquarium temperature is often the first thing people test for in-home aquariums and is critical for maintaining healthy metabolic functions in fish. Most fish are poikilothermic (meaning they don't regulate internal body temperature) but rather they rely on their environment so the temperature is an important factor.
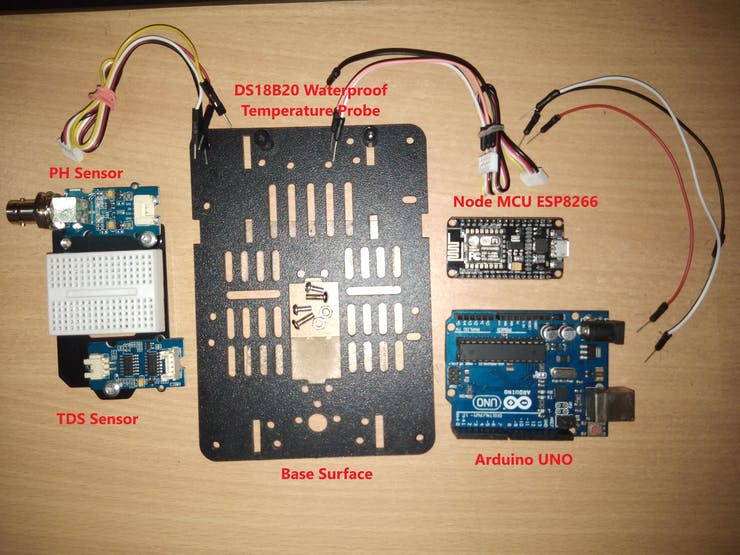
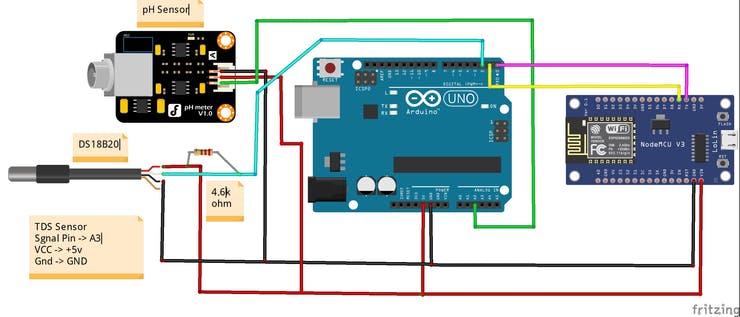
Step 1: Connecting all sensors and modules
Hardware connections are as follows.
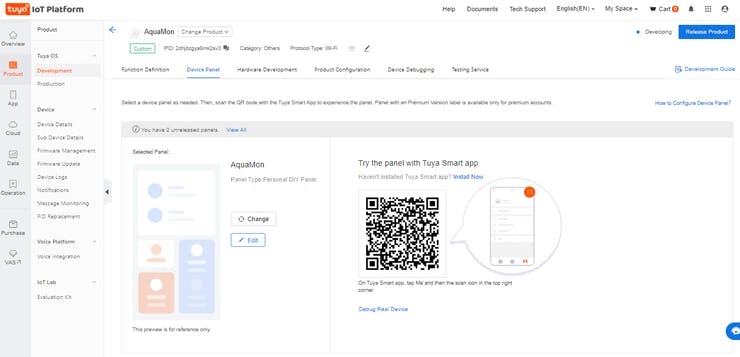
Step 2: Creating new product on Tuya
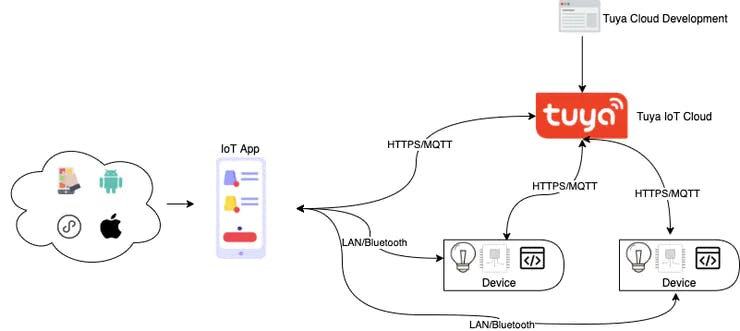
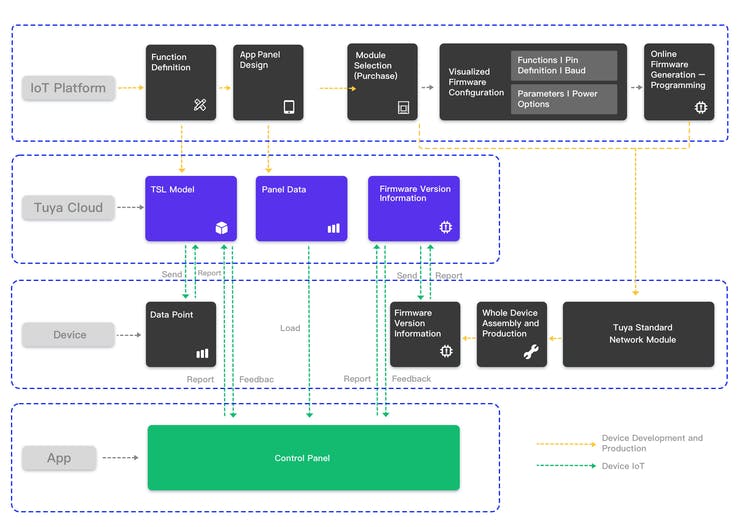
I am going to use the Tuya IoT platform to develop a smart device from scratch. The simplicity and fast response time of the Tuya IoT cloud are amazing, all you need to do is set up function definitions, design app panel, and burn authorization firmware and your device is ready to go with Tuya Android and iOS app. Check the flow of any Tuya Product development below.
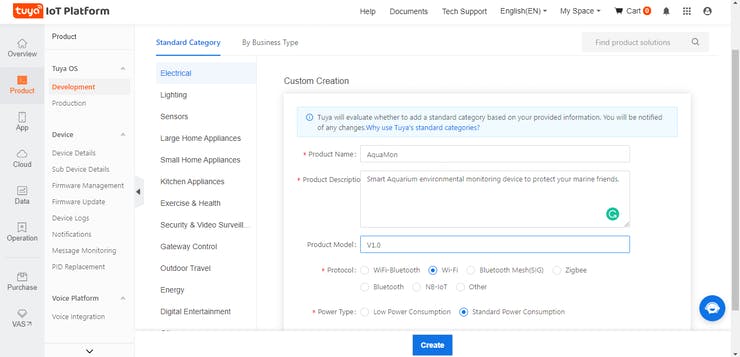
Check below, the steps on creating a new product on the Tuya IoT platform, if you haven't registered yet, register here. Then, go to the Tuya IoT Platform and click: Create ➡ Can't find the category?
Enter the required product information:
Protocol ➡ Wi-Fi
Power Type ➡ Standard Power Consumption
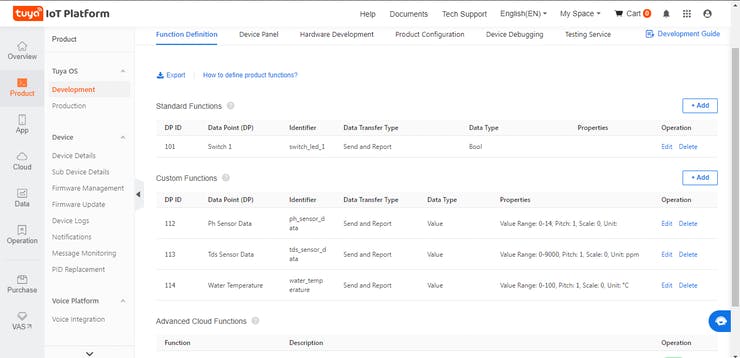
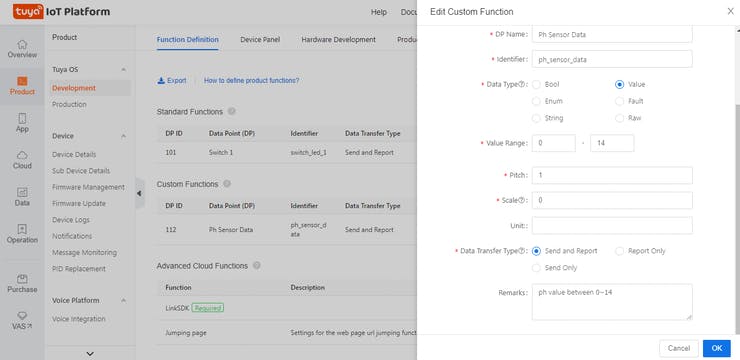
Create custom function definitions for your sensors with the below-shown data type and properties. Select the features you want to add to your product from Standard functions or create new ones (Custom) if not supported by Standard functions.
Standard functions indicate the functions provided by Tuya for their product categories. Since there are lots of built-in products, it is easy to find the functions you need. Also, you can create your specialized functions named Custom functions, depending on your project.
The data point (DP) is the abstract representation of a function, and each function has an ID and data type.
Data Point ID (DP ID): indicates the code of a data point (function). Tuya Cloud sends or receives data through data point IDs. I create three custom DP for TDS, pH, and temp sensors and one standard switch DP for controlling any actuators (you can add more switches to control actuators like fish feeders, buffer solutions pump, water cooling fan).
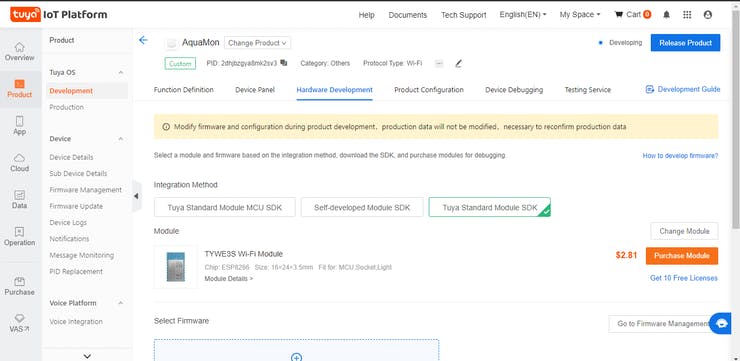
Select standard Tuya ESP8266 module SDK in the hardware development section.
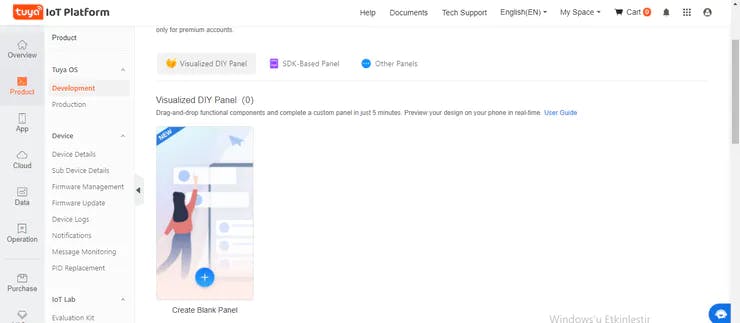
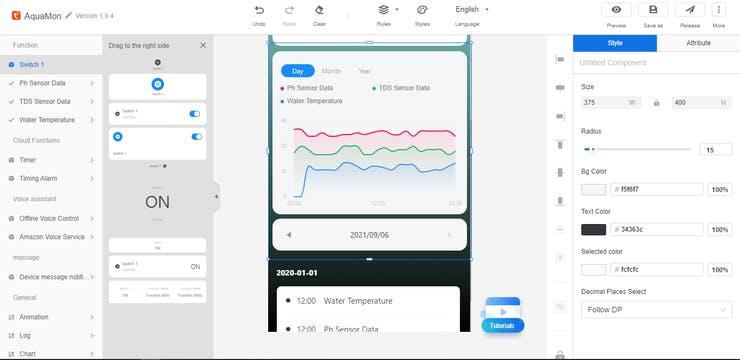
Step 3: Designing App Panel for our AquaMon device
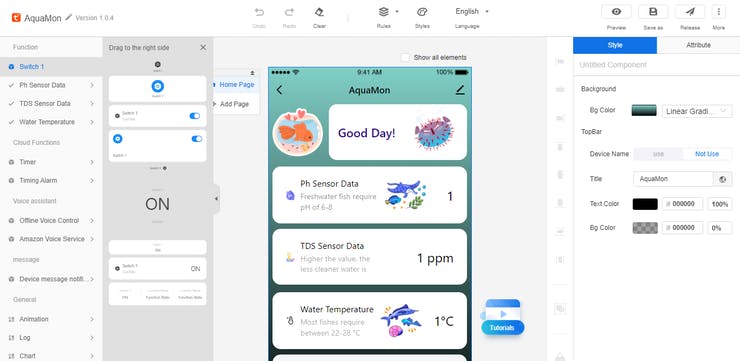
In the device panel, select Blank panel and let's customize and beautify it.
You would be able to see all your DP UI elements which you can modify. In fact, there are lots of UI available for you to drag-and-drop and make a fantastic panel. Once it's ready, click on the release button.
I have also added chart and log elements for greater data summarization.
Once your panel is released you should be able to see and use it by scanning through Tuya IoT app on mobile,
Step 4: Authorizing ESP8266 with Tuya IoT firmware
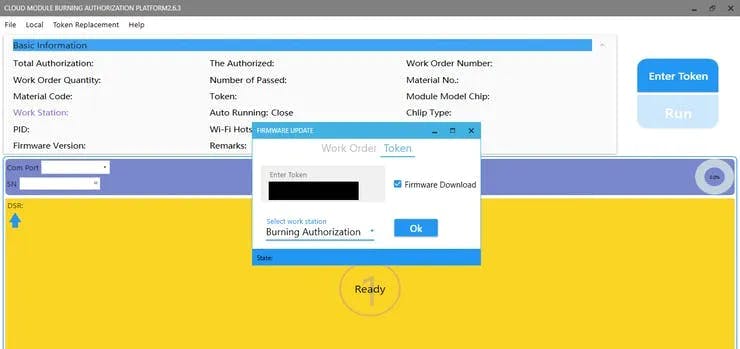
To be able to use the NodeMCU ESP8266 as a Tuya product for this project, you need to flash and authorize it with the required firmware. To authorize the ESP8266, you have to send the product ID (PID) and your Tuya IoT account name (e-mail) to [email protected]. After a while, they will send you a Token ID. Then, follow the steps below:
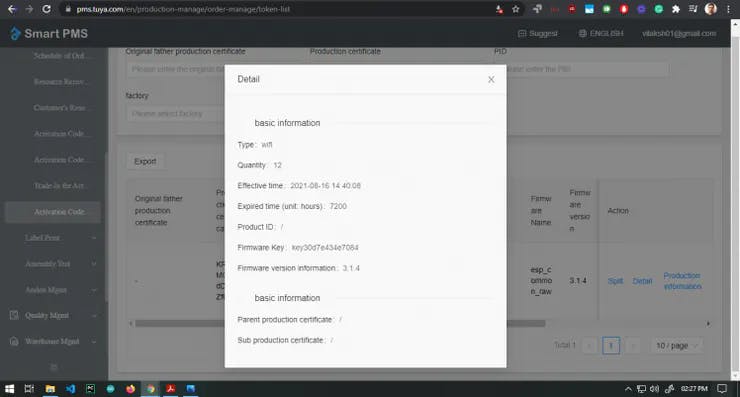
First, go to the Tuya PMS service page https://pms.tuya.com/en/login and sign up for an account if you don't have one. Then, go to Production Manage ➡Work Order Management ➡ Activation Code Verification. To activate the production certificate for the product, enter the Token ID. When the Token ID is confirmed, the ESP8266 is ready to be flashed and authorized. Remember only once ID can authorize from a single account. To check your activated Tokens go to Activation Code List in the Production Manage -> Work Order Management list.
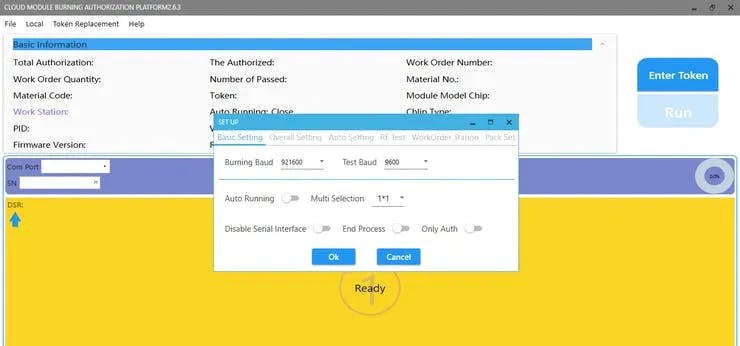
You can download the cloud auth token burning application from the PMS console Software Download section or Download installations package on the Google drive https://drive.google.com/file/d/1SF-rM5qDLaPJiuMHrkqFauVyRXSSHMkj/view?usp=sharing from Tuya ESP8266 guide (link in the reference section) and log in with your PMS account.
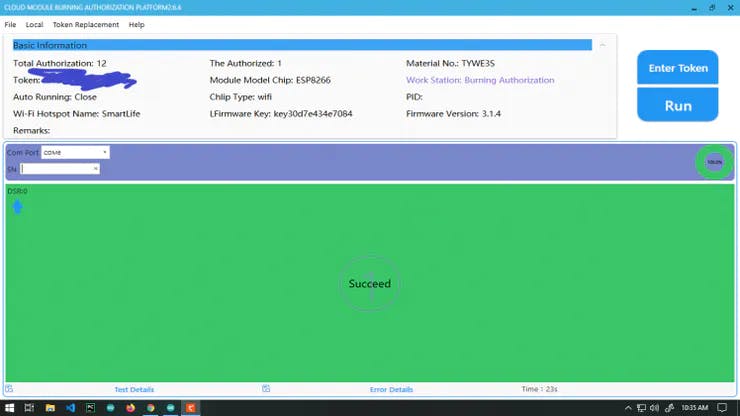
Set the baud rate and test baud as shown in the above image. Also, click on Enter Token button and enter the token you got from the Tuya [email protected] email reply.
Now, connect the NodeMCU V3 LoLin ESP8266 to the computer via a USB cable and select its port number, such as COM5. If you did not use it with the Arduino IDE or other compilers before, you may need to install its driver. Finally, click on flash to burn auth tokens. You would see a green box with success if nothing breaks.
Step 5: Programming and flashing Arduino
I will make this part simpler by going into details of the Tuya IoT Arduino library. First, import all required libraries to work with sensors and ESP8266 over Serial. Setup Tuya Serial connection,
SoftwareSerial conn(10, 11); // RX, TX
TuyaWifi my_device(&conn);
/* Current LED status */
unsigned char led_state = 0;
/* Connect network button pin */
int key_pin = 7;
Define and store all DP ids we made on the Tuya IoT platform while creating our new device.
/* Data point define */
#define DPID_Switch 101
#define DPID_Ph_Sensor_Data 112
#define DPID_TDS_Sensor_Data 113
#define DPID_Water_Temperature 114
/* Stores all DPs and their types. PS: array[][0]:dpid, array[][1]:dp type.
 *                                     dp type(TuyaDefs.h) : DP_TYPE_RAW,
 *                                     DP_TYPE_BOOL, DP_TYPE_VALUE, DP_TYPE_STRING, DP_TYPE_ENUM, DP_TYPE_BITMAP
*/
unsigned char dp_array[][2] =
{
  {DPID_Switch, DP_TYPE_BOOL},
  {DPID_Ph_Sensor_Data, DP_TYPE_VALUE},
  {DPID_TDS_Sensor_Data, DP_TYPE_VALUE},
  {DPID_Water_Temperature, DP_TYPE_VALUE},
};
Fill your PID from Tuya IoT console and firmware version like shown below,
unsigned char pid[] = {"2dhjbzgya8mk2sv3"};
unsigned char mcu_ver[] = {"3.1.4"};
In void setup( ) let us initialize all callbacks to Tuya IoT cloud,
void setup()
{
  Serial.begin(9600);
  conn.begin(9600);

  pinMode(key_pin, INPUT_PULLUP);
  pinMode(LED_BUILTIN, OUTPUT);
  digitalWrite(LED_BUILTIN, LOW);

  //Enter the PID and MCU software version
  my_device.init(pid, mcu_ver);
  //incoming all DPs and their types array, total DPs created (quantity)
  my_device.set_dp_cmd_total(dp_array, 4);
  //register DP download processing callback function
  my_device.dp_process_func_register(dp_process);
  //register upload all DP callback function
  my_device.dp_update_all_func_register(dp_update_all);
  delay(300);
  last_time = millis();
}
In the loop part, we need to start the uart service to allow Arduino to receive and send data to ESP8266 over serial and ESP8266 in turn sends it to Tuya IoT cloud.
First, check if the device is in network mode or not and connected to the cloud or not, you would be able to see the status via led, if led is stable it means it is connected to the cloud, if blinking it means in connection mode.
void loop(){
my_device.uart_service();

  //Enter the connection network mode when Pin7 is pressed.
  if (digitalRead(key_pin) == LOW) {
    delay(80);
    if (digitalRead(key_pin) == LOW) {
      my_device.mcu_set_wifi_mode(SMART_CONFIG);
    }
  }
  /* LED blinks when network is being connected */
  if ((my_device.mcu_get_wifi_work_state() != WIFI_LOW_POWER) &&
  (my_device.mcu_get_wifi_work_state() != WIFI_CONN_CLOUD) &&
  (my_device.mcu_get_wifi_work_state() != WIFI_SATE_UNKNOW)) {
    if (millis()- last_time >= 500) {
      last_time = millis();

      if (led_state == LOW) {
        led_state = HIGH;
      } else {
        led_state = LOW;
      }
      digitalWrite(LED_BUILTIN, led_state);
    }
  }
Now, implement your program logic to send data to Tuya IoT cloud and App Panelmcu_dp_update(DPID, value, 1), send your data values like this if the device is connected to the cloud.
phVal = calcPhVal();
  tdsVal = calcTDSVal();
  wTemp = waterTemp();

  /* report the pH, TDS and temperature data */
  if ((my_device.mcu_get_wifi_work_state() == WIFI_CONNECTED) || (my_device.mcu_get_wifi_work_state() == WIFI_CONN_CLOUD))
  {
    my_device.mcu_dp_update(DPID_Switch, true, 1);
    my_device.mcu_dp_update(DPID_Ph_Sensor_Data, phVal, 1);
    my_device.mcu_dp_update(DPID_TDS_Sensor_Data, tdsVal, 1);
    my_device.mcu_dp_update(DPID_Water_Temperature, wTemp, 1);
  }
  delay(500);
}
We also have the dp_process() function but it is to be used when you want to receive commands and take control over Arduino pins, like controlling actuators, just implement a switch case and do required actions based on triggered char dpid value.
/**
 * @description: DP download callback function.
 * @param {unsigned char} dpid
 * @param {const unsigned char} value
 * @param {unsigned short} length
 * @return {unsigned char}
 */
unsigned char dp_process(unsigned char dpid,const unsigned char value[], unsigned short length){
  /* all DP only report, if you want to take actions based upon user interactions with app modify dp_process*/
  return SUCCESS;
}
At last update all values, it ensures that all your data values are updated continuously, you can try skipping mcu_dp_update(DPID, value, 1) in void loop() since we already got a dp_update_all() function running continuously to update all values but make sure those variables are global.
/**
 * @description: Upload all DP status of the current device.
 * @param {*}
 * @return {*}
 */
void dp_update_all(void)
{
  my_device.mcu_dp_update(DPID_Switch, true, 1);
  my_device.mcu_dp_update(DPID_Ph_Sensor_Data, phVal, 1);
  my_device.mcu_dp_update(DPID_TDS_Sensor_Data, tdsVal, 1);
  my_device.mcu_dp_update(DPID_Water_Temperature, wTemp, 1);
}
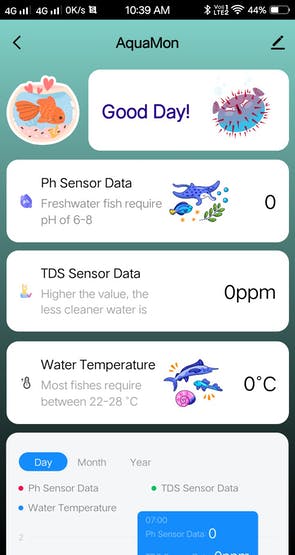
Let's have a look at the app, its amazing and so simple with Tuya to build own smart IoT gadgets.
References: