Control LEDs (Neopixel Ring) with an Arduino MKR1000 and Blynk App | An IoT Halloween Pumpkin.
Hello Everyone,
A few weeks ago was Halloween and following the tradition I carved out a nice pumpkin for my balcony. But having my pumpkin outdoor, I realised that it was quite annoying to have to go out every evening to light up the candle. And I also realised that it would be more funny, if I could change the colour of the candle light.
If you want to learn how to automate your pumpkin's lights and be able to have different colour lighting up your Halloween pumpkin, this tutorial is for you.
Here I will first show you how to use an IoT device (here an Arduino MKR1000) to control the ON/OFF switch of your pumpkin lights (RGB LED Neopixel Ring). In a second time, I will also show you how to set different lights colour using your smartphone. ???
Let's get started !
Supplies:
Here is the list of the components, you will need for this project. If you need to purchase any of the components, have a look at eBay or Amazon, you can purchase them for a fair price.
Step 1: Carving Out Your Pumpkin!
Have fun and enjoy the pumpkin soup with the pumpkin flesh you cut out from the inner part ??
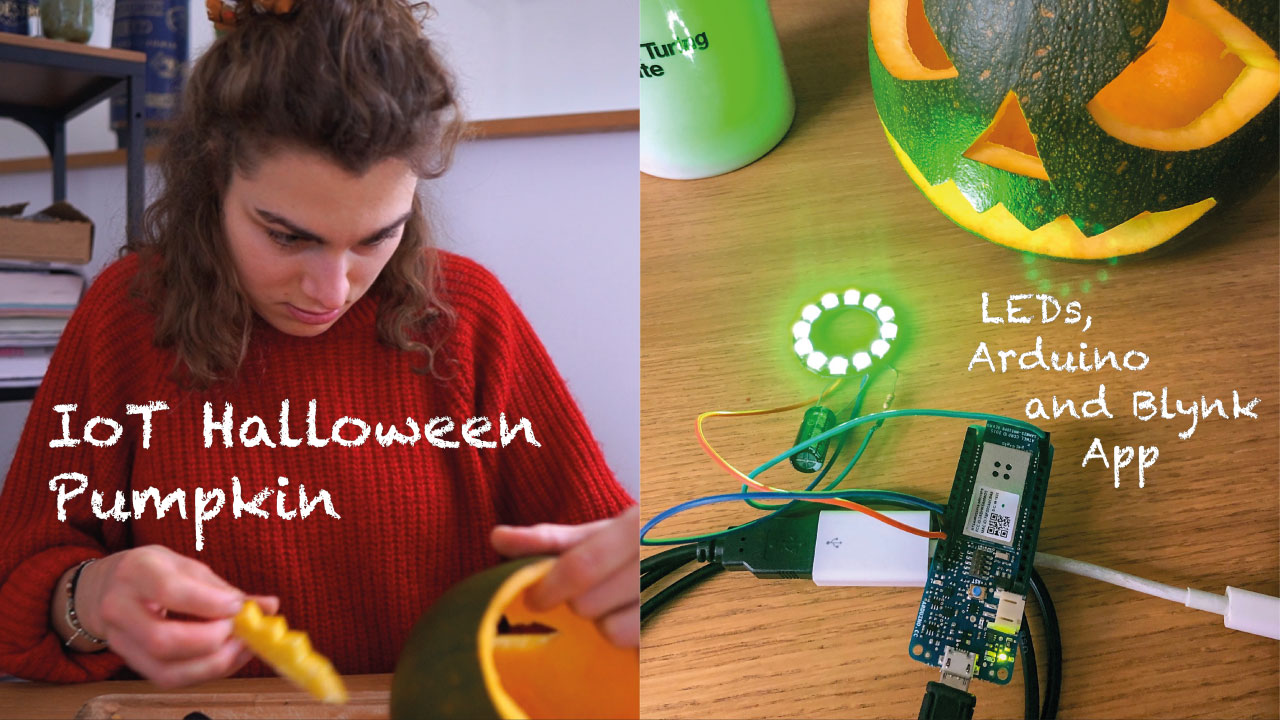
Step 2: Wire the Electronics Components
You will find the wiring diagram for this project below. Before starting the wiring, there are some few things you may have to consider.
In this project, I chose to use an Arduino MKR1000, which has an embedded WiFi chip. I decided to go with this Arduino as I wanted to be able to control my Arduino from my smartphone via WiFi. Also, I already had this board at home and wasn't using for anything else. Another option would be to use an Arduino Uno, Nano or any other Arduino with a ESP8266 WiFi module.
Compared to other Arduino, the MKR1000 runs at 3.3V. While you can supply 5V to the board via the USB port, you can't delivered more than 3.3V to the I/O pins. The MKR1000 has a 5V pin, which can be used to power 5V devices. In our case, we will use this pin to power our Neopixel ring. If you are using larger ring such as 16, 24 or more pixels, you may want to consider using a separate power supply.
The pumpkin and electronics will be on my balcony and so we will use a 3.7V LiPo battery to power our Arduino and the Neopixel. The MKR1000 BatteryLife tutorial is helpful to help you decide the capacity of the battery you are going to use. As I did not want to recharge the battery every day, I opted for a 2000mAh battery. Moreover, I decided to put the Arduino on standby mode when not lighting up my pumpkin. This helps to reduce power consumption as the WiFi module is turn off.
Wire your components
- Negative side to GND and positive side to 5V
- Solder the 470Ω resistor to the Data In (DI) pin
- Connect the 5V pin of the Arduino to the 5V of the Neopixel using a jumper wire
- Connect the GND pin of the Arduino to the GND of the Neopixel using a jumper wire
- Connect the #4 Digital pin of the Arduino to the DI of the Neopixel using a jumper wire
Once this is done, you will need to open the "IoT-Halloween-Pumpkin" GitHub folder and make some little changes to the code before uploading it to your Arduino. Hope you are ready for a bit of programming!! ????
Step 3: Programming Your Pumpkin
In this project, we want to program our Arduino so that the following is achieved:
- The Arduino is connected to the Blynk App via WiFi.
- The colours of the Neopixel lights are changed via the Blynk App.
You can find the code for this project in my "IoT Halloween Pumpkin" GithHub repository. But before you dig into it, you may want to read about few things that I have learned while doing this project! ???
LED Light Shows
The addressable LEDs or in Adafruit's language "NeoPixel" such as WS2812, WS2811 and SK6812 LED drivers can be controlled using Adafruit NeoPixel library. If it is the first time you are using NeoPixel, I will highly recommend you to have a look at Adafruit NeoPixel Uberguide. Full of advice and tips, it is a great resource!
To set up a LED colour to your pumpkin, you will have to send RGB values to your Arduino/NeoPixel. The simplest is to look at the colour code of some colours! Spiro Disco Blue, Harlequin, Daffodil or Rose Bonbon, here are some cool one.
A funnier way is to have colours on your NeoPixel "dancing". If you are really motivated, give it a go! Otherwise, check Tweaking4All LEDStrip Effects blog post. You will find code for some pretty amazing lighting effects. Another great resource is the Neopixel Effect Generator by Adriano.
Blynk App
The Blynk App is one of the most popular IoT platform. The Blynk App is incredibly easy to use and in less than 5 minutes you will be able to create an IoT app on your smartphone to communicate via Internet with your IoT device. Before tailoring your Blynk App to your need, you will need to:
- Download the Blynk app
- Install the Blynk library
- Set up the connection to your IoT device
The Blynk App has published great documentations to help everyone getting started. Have a look over here if as me, it is your first time using it.
Step 4: Enjoy!
Congratulations, you can now sit comfortably in your sofa and use your smartphone to control the LEDs' colours of your Halloween pumpkin. ???
Thank you for reading through my project. I hope you enjoy it and it will inspire you to undertake something similar for your LEDs on your Christmas tree, on your winter snowman, or anything else!