This is a termometar Intended for measuring the temperature in the room where we are staying, also known as Room comfort Thermomerter.
This time I will show you how to make a termometar Intended for measuring the temperature in the room where we are staying, also known as Room comfort Thermomerter.
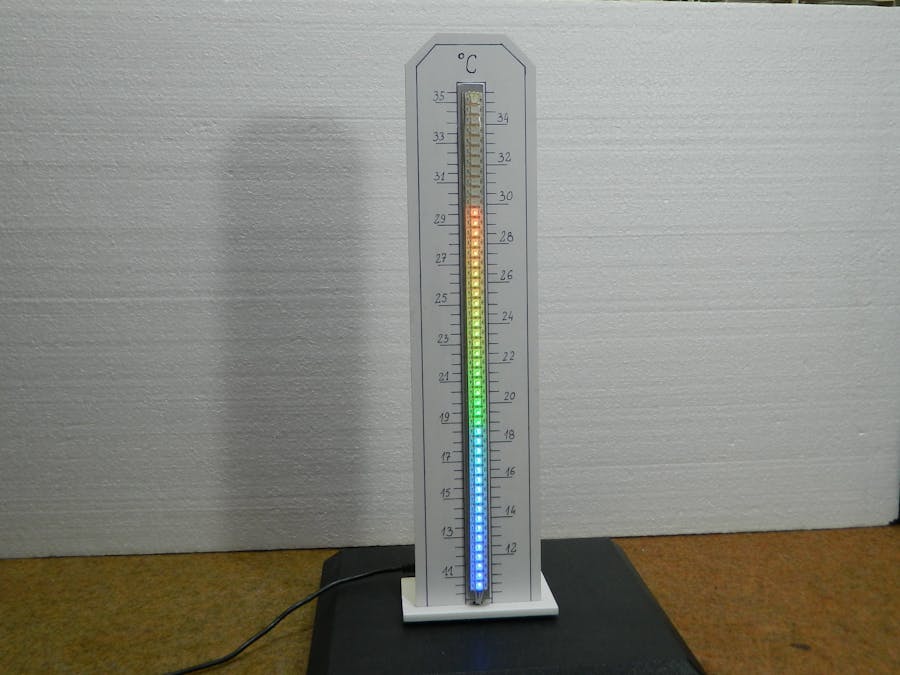
According to the purpose, its measuring range is from 10 degrees to 35 degrees Celsius. The thermometer has a resolution of 0.5 degrees. The temperature is displayed on WS2812 Led bar containing 50 diodes. Characteristic of this thermometer is that in addition to the scale, we can see the temperature through the color of the LED.
By changing the temperature, the color of the diode gradually changes from dark blue at lower temperatures, so next light blue, through green shades at comfortable temperatures, to red levels at higher temperatures. So with just a glance at the thermometer we can conclude whether the temperature is in the comfort zone.
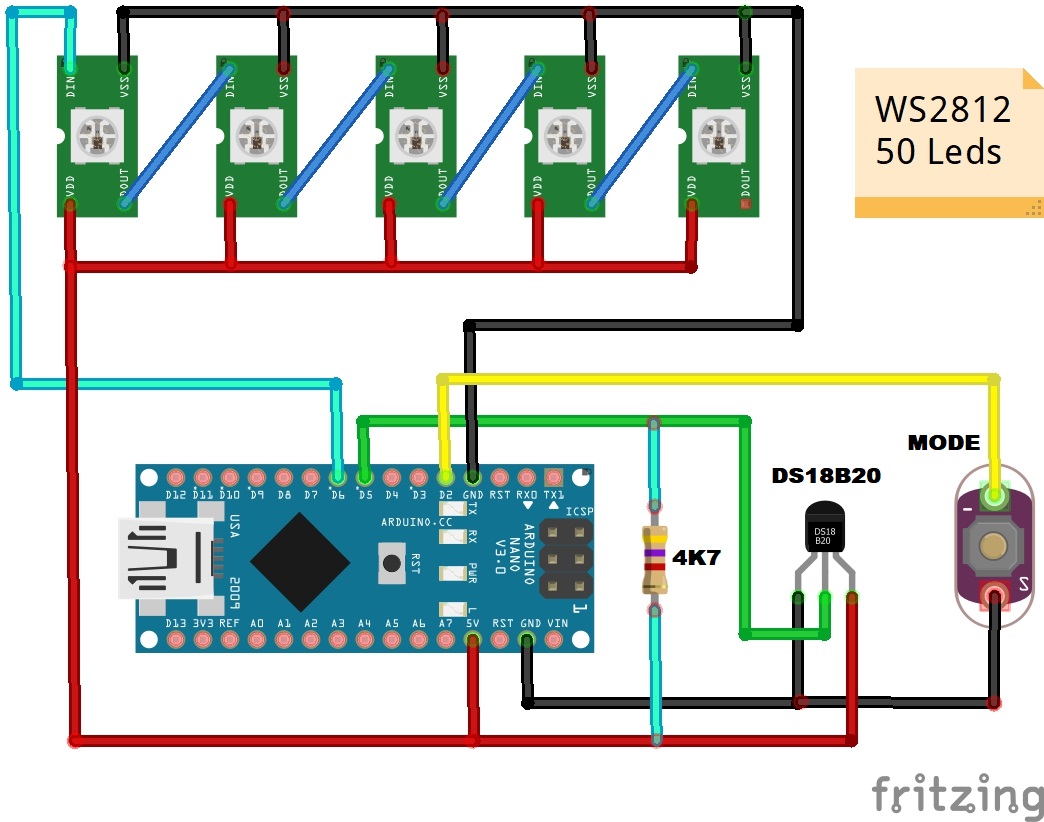
The device is very simple to build and contains only a few components:
- Arduino nano microcontroller
- WS 2812 Led strip with 50 Leds
- DS18B20 temperature sensor
- and momentary switch for changing the modes of working
When switched on, the thermometer operates in "DOT" mode and the current temperature is displayed by the illumination of one diode.
------------------------------------------------------
Get 10 PCBs only $5 https://www.pcbway.com/
------------------------------------------------------
By pressing the button, the mode of operation switches to linear. In this mode, all diodes light up from the initial to the specific temperature. The next time you press the button, the device switches to TEST mode, and now all the diodes are switched on successively one by one to the maximum and then returned. To return to DOT mode, we need press the key again.
#include "Wire.h"    // imports the wire library for talking over I2C
#include <OneWire.h>
#include <DallasTemperature.h>
#include <Adafruit_NeoPixel.h>
#define ONE_WIRE_BUS 5

OneWire oneWire(ONE_WIRE_BUS);

DallasTemperature sensors(&oneWire);
 float Celcius=0;

 int buttonPin = 2;    // momentary push button on pin 0
    int oldButtonVal = 0;

#define NUM_PIXEL 50
#define PIN 6
Adafruit_NeoPixel strip = Adafruit_NeoPixel(NUM_PIXEL, PIN, NEO_GRB + NEO_KHZ800);
 int nPatterns = 3;
    int lightPattern = 1;
int out =0;
int t =0;

void setup()
{
  Serial.begin(9600); //turn on serial monitor
strip.begin();
clearStrip();
strip.show();
strip.setBrightness(10);
pinMode(buttonPin, INPUT);
    digitalWrite(buttonPin, HIGH);  // button pin is HIGH, so it drops to 0 if pressed

sensors.begin();

}
void testing(){
  for(int L = 0; L<50; L++) {
clearStrip();
    strip.setPixelColor(L,wheel(((205+(L*3)) & 255)));//Gradient from blue (cold) to green (ok) to red (warm), first value here 205 = start color, second value here 42 = end color
 strip.show();
delay(100);
}
for(int L = 49; L>=0; L--) {
clearStrip();
    strip.setPixelColor(L,wheel(((205+(L*3)) & 255)));//Gradient from blue (cold) to green (ok) to red (warm), first value here 205 = start color, second value here 42 = end color

strip.show();
delay(100);
}
delay(1000);
}
void dot() {
   sensors.requestTemperatures();
   Celcius=sensors.getTempCByIndex(0)*2;

int t = map(Celcius, 20, 70, 0, NUM_PIXEL);

for(uint16_t L = 0; L<t; L++) {
clearStrip();
strip.setPixelColor(L,wheel(((205+(L*3)) & 255))); //Gradient from blue (cold) to green (ok) to red (warm), first value here 205 = start color, second value here 42 = end color
}
strip.show(); //Output on strip
Serial.print("The Temperature is: ");
Serial.print(Celcius);

delay(1000);
}

void line() {
   sensors.requestTemperatures();
   Celcius=sensors.getTempCByIndex(0)*2;

int t = map(Celcius, 20, 70, 0, NUM_PIXEL);

for(uint16_t L = 0; L<t; L++) {

strip.setPixelColor(L,wheel(((205+(L*3)) & 255))); //Gradient from blue (cold) to green (ok) to red (warm), first value here 205 = start color, second value here 42 = end color
}
strip.show(); //Output on strip
Serial.print("The Temperature is: ");
Serial.print(Celcius);

delay(1000);
}

void loop() {
  // read that stapressurete of the pushbutton value;
  int buttonVal = digitalRead(buttonPin);
  if (buttonVal == LOW && oldButtonVal == HIGH) {// button has just been pressed
    lightPattern = lightPattern + 1;
  }
  if (lightPattern > nPatterns) lightPattern = 1;
  oldButtonVal = buttonVal;

  switch(lightPattern) {
    case 1:
      dot();
      break;
    case 2:
   line();
      break;
      case 3:
      testing();
      break;
       }
}
//Color wheel ################################################################
uint32_t wheel(byte WheelPos) {
if(WheelPos < 85) {
return strip.Color(WheelPos * 3, 255 - WheelPos * 3, 0);
}
else if(WheelPos < 205) {
WheelPos -= 85;
return strip.Color(255 - WheelPos * 3, 0, WheelPos * 3);
}
else {
WheelPos -= 205;
return strip.Color(0, WheelPos * 3, 255 - WheelPos * 3);
}
}
void clearStrip(){
for(int i = 0; i < NUM_PIXEL; i++) {
strip.setPixelColor(i, 0);
}
}